The post Christmas in the UK: 5 Vegan Festive Treats Perfect as Gifts or Party Favours appeared first on Cattleya Kitchens.
]]>Here are easy to make and tastefully wonderful treats to give out to your guests once the party is over and allow them to remember the moment much longer.
1. Chocolate Covered Candied Orange Peels
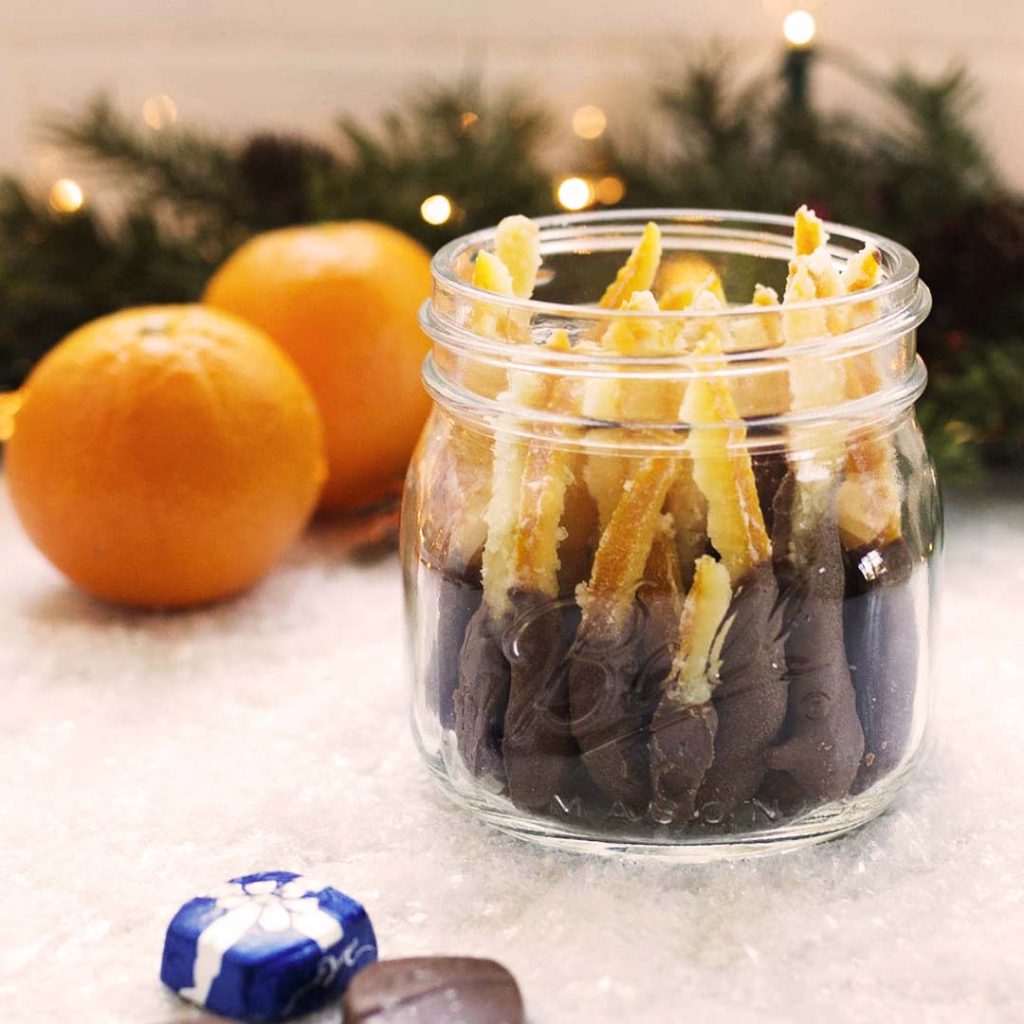
Some citrus, some tang, yes that’s right orange peels can be what you are looking for. A grown-up version of jelly candies without the guilt. Share this magical treat with everyone and surprise gift them with a jar of these.
Ingredients
3 navel oranges
4 cups sugar
4 cups water
1 bag milk chocolates or milk chocolate chips
Instructions
a. Start by peeling the oranges. Make 4 cuts along the curve from top to bottom, cutting through the peel but not the fruit. Remove the segments of peel carefully, trying not to tear them. Cut the peel into thin strips about ¼ inch wide.
b. Place the strips in a large saucepan and cover them with cold water. Bring the water to a boil, then strain and discard the water. Repeat this process two more times to remove some of the bitterness from the white pith.
c. Once the strips have been boiled 3 times, combine the 4 cups of sugar and 4 cups of water in a saucepan and bring it a boil, stirring occasionally until the sugar dissolves. Add the orange peels to the boiling syrup and reduce the heat to medium-low. Continue to simmer the peels for one hour. Peels should be very limp and start to look translucent.
d. Remove the pan from the heat, and let the strips cool in the syrup.
e. Remove the peels from the syrup and place them on a wire cooling rack set over waxed paper. Let them drip and dry for about 30 minutes. At this point you can roll them in granulated sugar or leave them as is. I skip the sugar step however the sugar creates a nice sparkle and extra crunch.
f. In a heat proof bowl set over simmering water, melt Milk Chocolate over low heat. Once chocolate is completely melted, dip peels half way into the chocolate and place back on the cooling rack to set. Leave out at room temperature in a cool place overnight.
g. Package in glass jars with a tight fitting lid for storage or gifting!Notes
Chocolate Covered Candied Orange Peels
The candied peels will keep, in a sealed jar, at room temperature for up to two weeks.
2. Keto Trail Mix

This keto trail mix is a low-carb trail mix that will allow your guests to have a snack on their way home. Plus, it can be customised to your likes or guests like and have their own jar of trail mix just lay all the ingredients in a bowl and have them scoop the ones they like.
Ingredients
1/2 cup sugar free candied pecans
1/2 cup sugar free candied almonds
1/2 cup keto chocolate chips milk, white, and dark
1 cup sugar free candied nuts
1/2 cup coconut cashews
Instructions
a. Combine all the ingredients in a large mixing bowl and stir until fully incorporated.
b. Pour into individual baggies or jars and seal to avoid added moisture.Notes
Keto Trail Mix
This trail mix is customizable. Use any nuts or seeds of choice.
TO STORE: Leftover trail mix should be stored in a sealable container, at room temperature, for up to 2 months.
TO FREEZE: You can freeze the trail mix in a ziplock bag for up to 6 months.
3. Vegan Danish Butter Cookies

The tin can that always has a sewing kit can be filled with your very own baked vegan Danish cookies. The well-loved treat perfect pair with a cuppa or coffee. This will bring your guests a quick trip down memory lane.
Ingredients
200 g / 7 oz dairy-free buttery spread
130 g / 4.5 oz confectioner’s sugar
310 g / 11 oz plain flour
1 tbsp corn starch mixed with 2 tbsp water
2 tsp vanilla bean paste or vanilla extract
1 tbsp almond milk, if needed
2 tbsp white sugar, for decorationVegan Danish Butter Cookies
Instructions
a. Preheat oven to 180C / fan 160C / 350F. Line a baking sheet with greaseproof paper.
b. Mix together the dairy-free butter and icing sugar to create a soft buttercream.
c. Add the rest of the ingredients, minus the milk, and mix until just combined. If the mixture is too dry, add the 1 tbsp of milk or more until a soft but firm batter is formed.
d. Create the cookie shapes either using a cookie press, piping bag or simply dropping a tsp of batter onto the sheet.
e. Bake for 10-15 minutes, regularly checking to make sure they are baking evenly. Turn your baking sheet around to face the other way half way through, if necessary.
f. Let cool for 10 minutes on a cooling rack then sprinkle with sugar. Enjoy!
4. Chocolate Truffle Energy Bites {Raw, Vegan, Gluten-free}

These chocolate truffles are an energy bite that is healthy and delicious and comes in a variety of festive colours perfect as party favours for all your guests. It can be a pre-or post- workout snack without feeling guilty of indulging in one or more of it.
Ingredients
2 cups (about 9.5 oz.) dates, pitted and soaked
1 cup (about 5 oz.) raw almonds, hazelnuts, cashews, or walnuts, or a mix, soaked overnight
½ cup (1.5 oz.) shredded unsweetened coconut
2 TBSP coconut oil, melted
3 TBSP (30g.) hemp seeds
1 TBSP (7g.) chia seeds
2-3 TBSP (14-21g.) cocoa powder, or raw cocoa powder, to taste
pinch of salt (this helps amp up the flavor, but can be omitted if you wish)
Any toppings you like, such as chopped nuts, shredded coconut, cocoa powder, freeze dried raspberries (pulverized into a powder with a spice grinder or mortar and pestle), hemp seeds, etc.Chocolate Truffle Energy Bites {Raw, Vegan, Gluten-free}
Instructions
a. Place the nuts in a bowl or glass measuring cup, and cover with cool tap water. Let soak overnight, or for a minimum of one hour before using. In a separate bowl, do the same with the dates. (Soaking the nuts makes them easier to digest, and soaking the dates makes them blend better.) Once soaked, drain the nuts and dates thoroughly before continuing.
b. Add the nuts to the bowl of your food processor, and blend until finely ground. Then add the dates, coconut, coconut oil, hemp seeds, chia seeds, cocoa powder, and salt if using. Blend well, scraping down the sides as needed, until a thick, sticky dough forms. (Depending on your food processor, you may need to add a small amount of water to help it along, but try not to add any more than is necessary. The longer you blend (and the more powerful your food processor) the smoother the dough will become, and the softer your truffles will be. For firmer truffles, blend just until the mixture holds together when rolled between your palms into a ball. For softer truffles, continue to blend until the dough is very smooth and sticky. If the dough becomes too sticky to roll into balls, place it in the fridge or freezer for a few minutes. Getting your hands slightly damp will help, too.)
c. Roll the dough mixture into ½-1 TBSP sized balls, and place on a plate or baking sheet. Roll in desired toppings, then store in an airtight container in the fridge for up to several weeks (possibly longer, though I usually run out by then), or in the freezer indefinitely.
5. Pretzel Sandwiches

This cookie for the lazy is your guilt-free party favour perfect as a snack after the dinner party or a treat on their way back home. It can also be stored in an airtight jar to keep its freshness like a cookie jar.
Recipe was translated to English via Google translate:
Ingredients
2 tbsp peanut butter
2 tbsp coconut flour (you can replace it with almond flour etc.)
1 teaspoon maple syrup (a little more if you like it sweeter)
A bag of small pretzels
100 g vegan dark chocolate
Nuts, almonds, berries etc for the decoration, if you likePretzel sandwiches
Instructions
a. Chop the chocolate and melt it in a double boiler.
b. Cover a plate with wrapping paper or greaseproof paper and set aside.
c. You process the peanut butter with the coconut flour and maple syrup into a non-sticky, malleable dough. If it is still too wet, add a little more flour. Conversely, if it is too dry or crumbly, add a little more peanut butter or maple syrup.
d. Tear open the pretzel bag and eat a few first.
e. In front of you on the work surface should be from left to right: bowl with peanut dough, bag with pretzels, melted chocolate (preferably in a bowl), plate with baking paper, decorative items for on top.
f. Now form a teaspoon-sized ball out of the peanut-coconut dough, which you then press flat between two small pretzels, pull the whole or half of it through the chocolate, let it drip off a little and place it on the paper.
g. Repeat until either batter or pretzels are running low. Plaster the rest unprocessed.
h. You can now decorate the pretzel bites, if you like it, if you don’t like it, I can’t help either. I mean what can you say?
Aside from these party favours we also have created list of Indian cuisines fit for the holidays to make your gathering even more special. Give it a try and embrace another culture in your home.
Over to you…
The cold season just gives you the ‘brrr’ moment and a kitchen that is not up for the job gives you the ‘grrr’ moment so be sure to have the kitchen you deserve. Allow us to help you achieve your dream kitchen and talk to us. Happy cooking!
The post Christmas in the UK: 5 Vegan Festive Treats Perfect as Gifts or Party Favours appeared first on Cattleya Kitchens.
]]>The post Why You Should Hire a Kitchen Fitter Near You? appeared first on Cattleya Kitchens.
]]>To further set your mind on the right track, here’s a list of reasons to prove choosing a kitchen near you is better than hiring someone far away (*results may vary)
1. Getting in Touch with a Nearby Kitchen Fitter Means Less Travel Cost
If you live around Ealing and search “Kitchen Showroom Ealing” on Google, you will be shown a list of kitchen fitters like us to help you create your ideal kitchen. Fewer travel costs mean more kitchen budget.
What sets us apart from our competitors; we will appoint you your own designer who will then guide, help, and work alongside you throughout the process to achieve your bespoke kitchen.
2. Range of Luxurious Quality Kitchen Supplies

We offer a range of luxurious and top-of-the-line quality kitchen supplies from Siemens, Neff, Ballerina Kitchens, and more, to not only provide you with a beautiful kitchen but a practical and functional one.
Choosing branded quality kitchens allow you to have peace of mind on your investment as they offer a year of warranty* and a lifetime guarantee*.
3. Design Revisions can be Catered, No Hassle
If you have changes or alterations you want to consult the possibility, you can email, chat, or call us but going into the showroom and having a seat-down meeting allows us to create ideas together and see firsthand samples of the materials to be used before making any final decisions.
Sending packages back and forth is okay too but the time it will consume will make the renovation a lot longer than expected and more costly.
4. Faultless Dream Kitchen Achieved

Since sample items are seen beforehand, the seat down meeting already tackled kitchen design amendments, and finishing touches are already discussed, it just leaves you with a faultless kitchen designed specifically for you with real satisfaction.
The duration/timeframe of the renovation will also be discussed to achieve a hassle-free experience while the work is ongoing.
Over to you…
Thinking of renovating your kitchen soon but worried about cost, quality, and downtime? No worries, here at Cattleya Kitchens, we try our best to provide the kitchen you deserve on a budget worthy of your investment. Talk to you soon!
The post Why You Should Hire a Kitchen Fitter Near You? appeared first on Cattleya Kitchens.
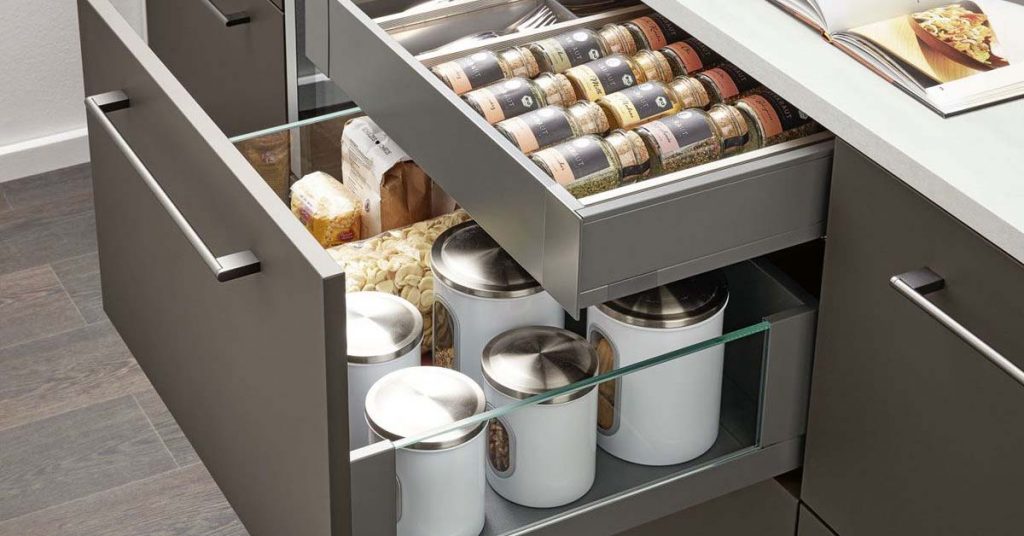
]]>The post Kitchen Drawers: 7 Pullout Drawer Design Inspirations for Your Next Kitchen Project appeared first on Cattleya Kitchens.
]]>1. Green Velvet Lacquer Pullout Kitchen Drawer
The vintage green velvet lacquer matched with gold handles creates a luxurious yet timeless kitchen design that invites you to cook, mingle, and have a meal together.
A closer look at the pullout drawer of Lux-B 49499 shows that the sides are equipped with see-through glasses allowing you to see items not visible in the top view perspective plus the smooth gliding feature is just a breath of fresh air.
2. Polished Walnut Wood Pullout Kitchen Drawer
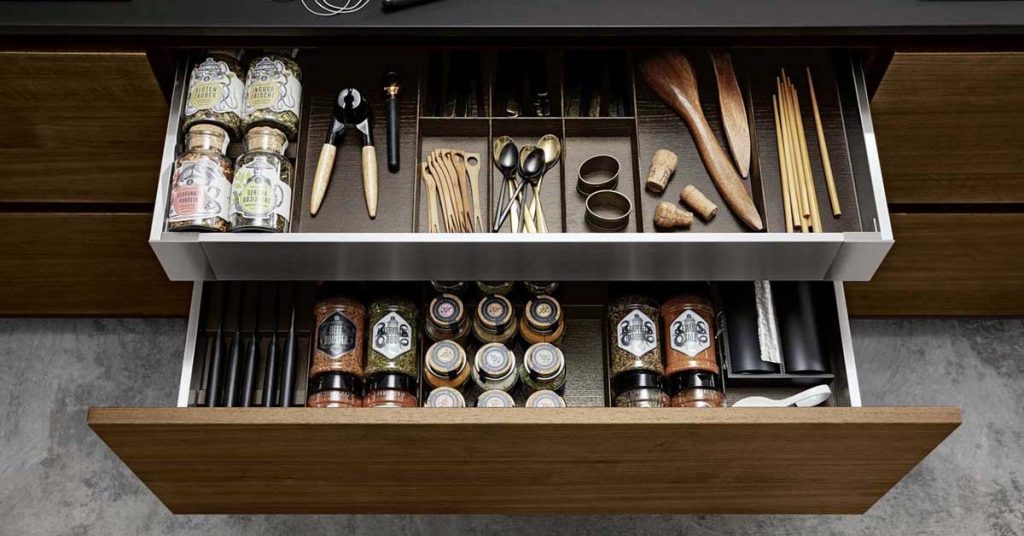
Choosing Florenz 6810 polished walnut is choosing something timeless that even 5-10 years have passed your kitchen is still stylish and warm.
The idea is to maximise your drawer unit by having a drawer in a drawer design. You can say it’s a drawer-ception. The upper drawer is equipped with dividers in varying spaces perfect storage for your kitchen tools and even spices while the lower part offer a higher drawer space suited for canned goods and more.
3. Art Pepper Pullout Kitchen Drawer

The Pur 2661 art pepper finish reminds you of the outside setting in gray tones. It is compact enough to store all your kitchen essentials in two varying heights.
Notice the transparent glass side details that feature is used in almost every design as it is that much convenient and useful.
4. Concrete Look Pullout Kitchen Drawer
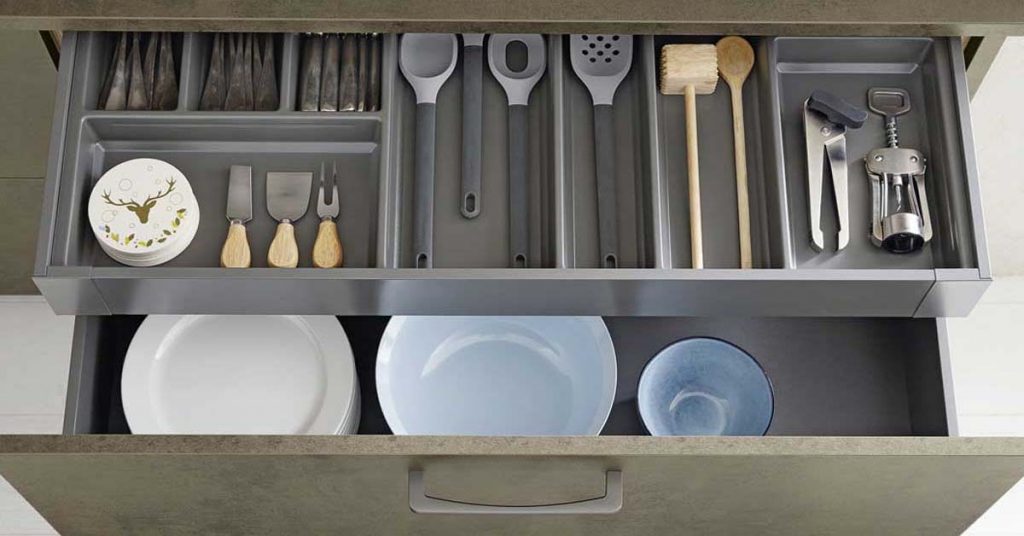
Top 1606 concrete look is your never get dirty kind of style. It is also a drawer-in-drawer style that has an upper drawer perfect for kitchen tools and the lower drawer suited for crockery.
Plus, the smooth-gliding drawers are always a crowd favourite.
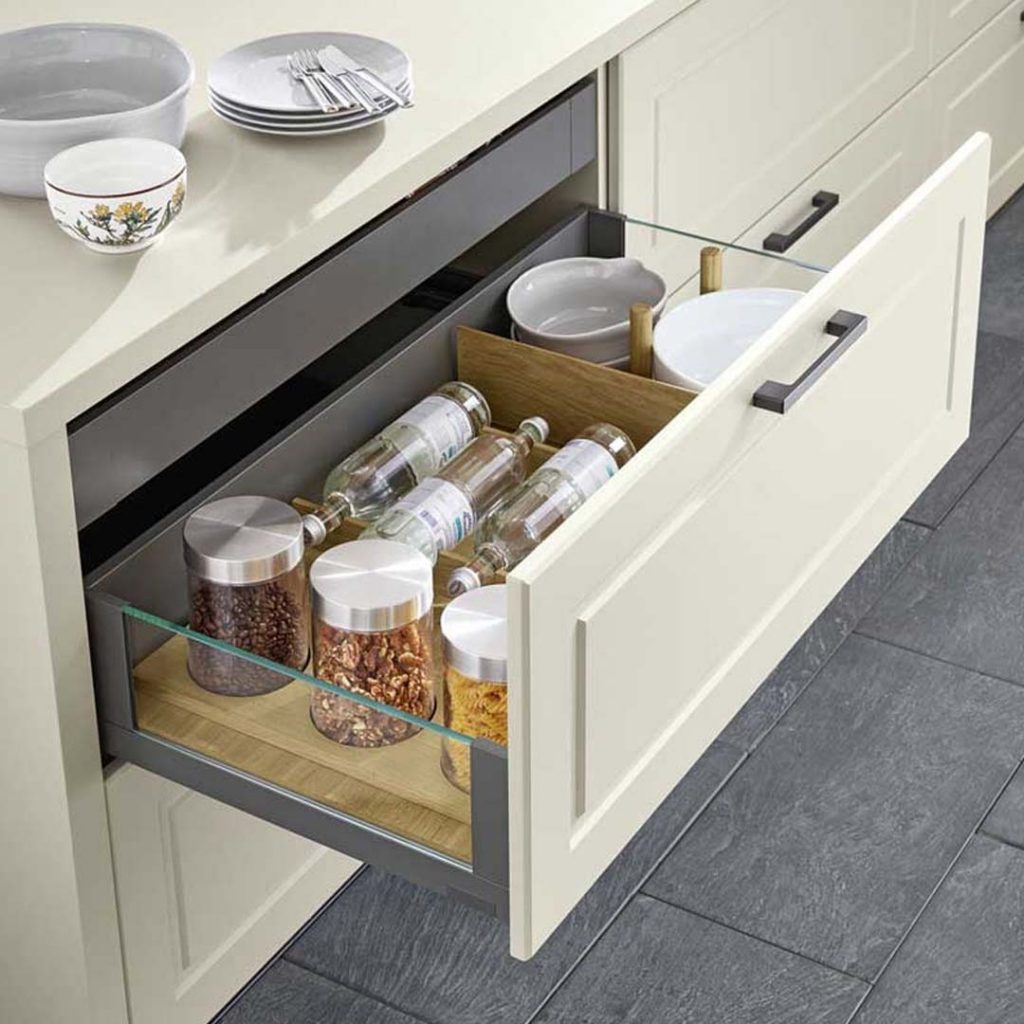
5. Super Matt Resopal Pro Pullout Kitchen Drawers
It is always a pleasure to stare at a properly arranged drawer just like this Resopal Pro 30001 drawer unit. The inside is as breath-taking as the outside design enough to make you want to cook and mingle in your kitchen while bonding over a scrumptious meal.
6. Light Colour Shade Pullout Kitchen Drawer

The light shade colour of Sofie- B 4769 is your pristine, neat, and bright kitchen design that radiates freshness. The inside drawer is equipped with wooden dividers to match the overall interior of this kitchen setup making it cohesive and irresistible.
7. SealBrown DirektLACK Lacquer Finish Pullout Kitchen Drawer
The Top 1466 design is used in a loft-living plan where clever designing is a must. The pullout kitchen drawers became quite the star in this set-up as it can store plenty of spices and varying heights of jars.
Plus, the smooth-gliding and side transparent glass features are still in place which makes this one more useful.
Over to you…
Ready to embrace clever pullout kitchen drawers? Just get in touch with us and allow us to create a functional and convenient cooking space you deserve. Happy cooking!
The post Kitchen Drawers: 7 Pullout Drawer Design Inspirations for Your Next Kitchen Project appeared first on Cattleya Kitchens.
]]>The post Kitchen Islands: 5 Gourmet Island Designs Perfect Fit for every Cooking Enthusiasts appeared first on Cattleya Kitchens.
]]>The bond created while cooking and enjoying a meal together is like a warm supporting hug that can definitely tell you that things will be alright.
If we’ve changed your mind and now thinking of incorporating a kitchen island, here are some kitchen island design inspirations you can integrate into your home right now:
1. Light Colour Shade Kitchen Island

The Sofie-B 4769 gourmet unit is your sink, stove, and storage in one. It has unique takeaway boxes that allow you to transport your spices and other kitchen tools all organised in their own unit.
This island also boasts various smooth-gliding drawers with their own customised wood elements to properly arrange all your spices and crockery.
2. Dark Green Velvet Lacquer Kitchen Island

The Lux-B 49499 gourmet island comes with its own attached dining table allowing conversation between the cook and the helpers. It has your induction cooktop unit with enough storage space to house all your most-used kitchen tools creating a convenient cooking space.
3. Dark Shade Art Pepper Kitchen Island

An open space kitchen allows you to have more storage space achieve with Pur 2661 L-shaped kitchen island. It has multiple kitchen drawers in varying heights and sizes to store all your most-used kitchen tools ready to be used located just below your cooking area.
4. Dark Super Matt Coloured Kitchen Island


Want a kitchen island but also want to have more access around it? No worries, the Resopal-Pro 30001 two unit kitchen islands have got you covered. It can house your cooking station and provide you with the necessary storage space for all your cooking needs.
5. Walnut Imitation-Dark Kitchen Island

Add more storage space in your kitchen setup with Florenz 6810 kitchen island. It is your conventional kitchen island that has both your cooking and washing area with plenty of storage space.
The idea is to allow you to multitask on your kitchen duties in just a one setting location lessening travel time around the kitchen and more time for cooking.
Over to you…
Ready to experience a functional and convenient kitchen island in your home? Allow us to help you and together let’s make your dream kitchen a reality.
The post Kitchen Islands: 5 Gourmet Island Designs Perfect Fit for every Cooking Enthusiasts appeared first on Cattleya Kitchens.
]]>The post Convenient Cooking: 4 Functional Kitchen Fixture/Appliances for your Next Kitchen Upgrade appeared first on Cattleya Kitchens.
]]>To help you create a functional kitchen, here are our chosen kitchen appliances you can integrate into your cooking area to achieve convenient cooking:
1. Stainless Steel Franke Sinks
Stainless steel sinks are favoured in commercial kitchen, restaurants, and even hospitals due to their advantageous qualities.
Not only it features resistance to corrosion, rust, and withstand extreme temperatures, it can also be accessorised with other kitchen tools like adding a strainer that fits in the sink for quick draining while chopping vegetables on the drainer.
2. Bosch 500 Series Single Wall Oven 24” Stainless Steel

Bosch 500 Series Single Wall Oven 24” Stainless Steel is your genuine European convection designed for smaller kitchens. It has satisfiable and reliable features like:
- Unique ring control design with TFT display
- Extra Large Door Window for Easy Monitoring of Cooking Process
- Genuine European Convection for Even Baking Results on Multiple Racks.
- 11 Specialized Cooking Modes – Gourmet Cooking Made Easy
It can be installed flush for a sleek look or built-in that makes a timeless statement which helps you to deliver delicious meals every time.
3. Blanco-S Semi-Profi

Blanco-S Semi-Profi is created to meet the demands of the kitchen suitable for the professional in you.
Its clever details, such as the flexible hose, a perfect, flexible arc with its stainless steel spring, guarantees a pleasant cooking experience. It also has a control lever with default settings of cold-start function to save energy, it can also be installed near the wall perfect for single bowls.
4. Neff N 70 wall-mounted cooker hood 90 cm

Neff N 70 wall-mounted cooker hood 90 cm clear glass black printed D95FRM1S0B offers not only high-performance but other practical features like:
- EfficientDrive: save energy and enjoy a quieter kitchen thanks to efficient brushless motor technology
- It can be written on and used as bookshelf
- Intensive speed setting: increases the extraction rate when the steam gets intense
- LED lighting: a clear illumination whilst cooking thanks to the energy-saving LED lights
With a lot of new kitchen appliances being released, make the conscious choice of choosing eco-friendly appliances and at the same time cost you less on your bill.
Over to you…
Took an interest from one of the items on the list? Take a screenshot and send it to us and let’s start designing your dream kitchen together. Happy cooking!
The post Convenient Cooking: 4 Functional Kitchen Fixture/Appliances for your Next Kitchen Upgrade appeared first on Cattleya Kitchens.
]]>The post Fanciful Romantic Vegan Valentine’s Day Full Course Dinner Meal Recipes appeared first on Cattleya Kitchens.
]]>- Appetizer: Bruschetta with Heirloom Tomatoes, Olives, and Basil
- Entree: Pasta or Steak
- Dessert: No-Bake Chocolate Cheesecake
- Drinks/Cocktails: Rosé Vodka Cocktail
- Charcuterie board: Tangy Herbed Vegan Cheese Spread
Valentine’s Day is just around the corner, make someone happy and feel loved by preparing a fancy tasteful home-cooked meal full of love.
To help you with what to prepare on this romantic day, here’s a full course meal to fill your appetite with and enjoy a lovely night together.
Appetizer: Bruschetta with Heirloom Tomatoes, Olives, and Basil

Start your dinner light with a classic favourite of Bruschetta. It is an easy recipe that is always a hit. It can also be customised according to your taste.
INGREDIENTS
1-1/2 lbs ripe tomatoes (preferably heirloom), cored and diced (3 to 4 tomatoes)
1/4 cup pitted Kalamata olives, finely chopped
2 teaspoons balsamic vinegar
1/4 cup finely chopped fresh basil, plus more for serving
1/4 teaspoon salt
A few grinds freshly ground black pepper
1/2 cup extra-virgin olive oil, divided
1 good quality baguette, cut into scant 1/2-in-thick slices on the bias
1 clove garlic, halved lengthwiseBruschetta with Heirloom Tomatoes, Olives and Basil
INSTRUCTIONS
a. Preheat the oven to 425°F and set a rack in the middle position.
b. In a medium bowl, combine the tomatoes, olives, balsamic vinegar, basil, salt, pepper, and 1/3 cup of the oil. Toss to combine, then taste and adjust seasoning, if necessary. (If the tomatoes aren’t as sweet as you’d like, add 1/8 teaspoon sugar.)
c. Arrange the bread slices on a baking sheet. Brush both sides of the bread with the remaining 3 tablespoons of oil. Bake for about 10 minutes, until crisp and golden on the bottom.
d. Using tongs, flip the bread slices so the golden side is facing up. Rub the top side of each slice with the cut side of the garlic, going back and forth once (or twice, if you like your bruschetta extra garlicky). Transfer the toasted bread to a serving platter and top each slice with a spoonful of the tomato mixture. Sprinkle the bruschetta with more basil. Serve within 10 minutes so that the bread stays crisp.
e. Make-Ahead Instructions: The tomato mixture can be prepared up to 3 hours ahead of time and stored in a covered container in the refrigerator. Taste and adjust seasoning before topping the toasted bread.
Entree: Pasta or Steak
Pasta: Vegetable Bolognese
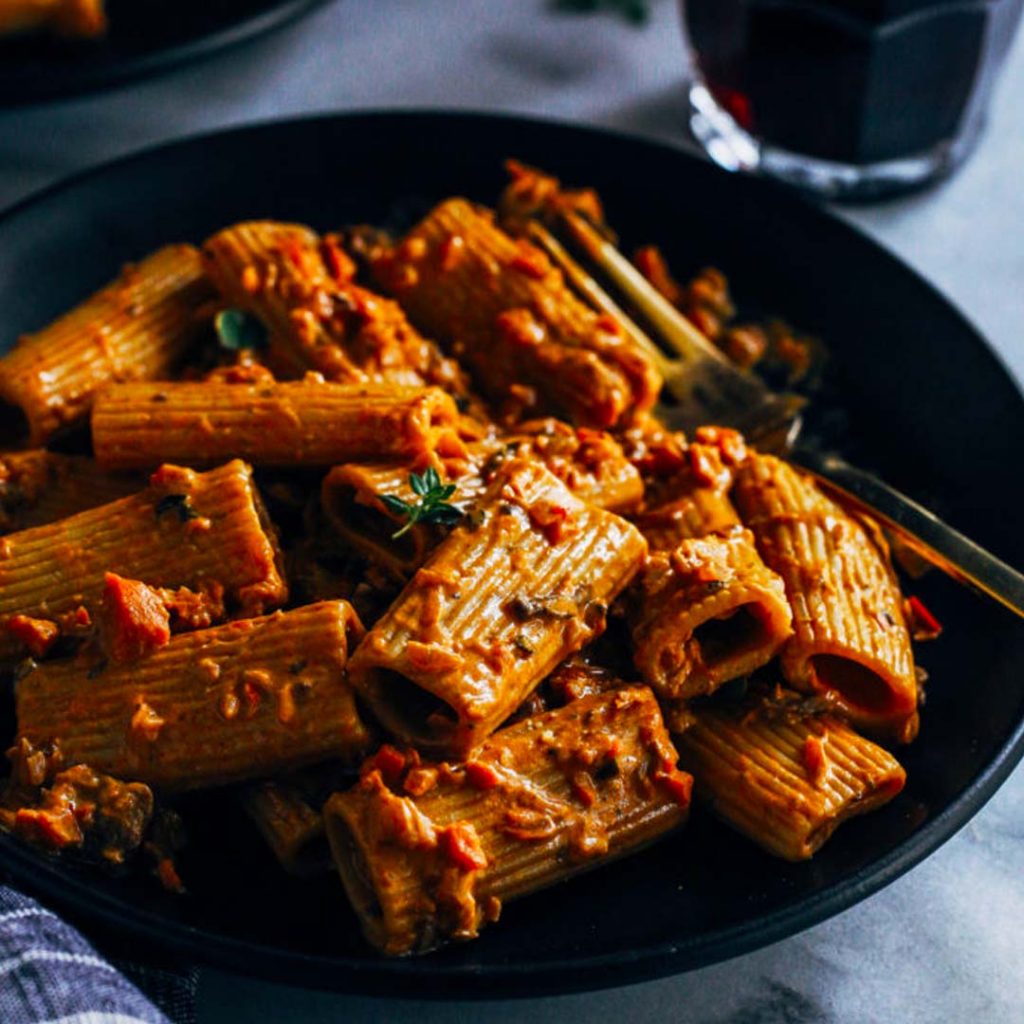
Vegetable Bolognese, comfort food that is always a hit comes with a twist full of umami flavour. It is the perfect food for your cosy night in.
INGREDIENTS:
1 cup raw cashews
1 ounce dried mushrooms (I like porcini)
4 tablespoons olive oil
1 large onion, roughly chopped
3 garlic cloves, minced
3 carrots, roughly chopped
1 red bell pepper, cored and roughly chopped
2 teaspoons salt
1/2 teaspoon pepper
4 tablespoons tomato paste
2 teaspoons fresh or dried thyme
1 teaspoon fresh or dried oregano
8 ounces fresh mushrooms, finely chopped
1/2 cup dry red wine (such as cabernet, merlot or pinot noir)
1/4 cup lemon juice (about 2 lemons)
1 tablespoon miso
2 tablespoons nutritional yeast
1/2 teaspoon salt
1 lb rigatoni pasta (preferably whole grain)*Vegetable Bolognese
DIRECTIONS:
a. In a small pot, bring 3 cups water to a boil. Turn off the heat, add the raw cashews and allow to soak for 30 minutes.
b. In a measuring cup, microwave 1 cup water for 2 minutes, or heat until boiling. Add the dried mushrooms and allow to soak for at least 15 minutes.
c. Using a food processor, finely chop the onion, red pepper, garlic and carrot. In a large pot, warm the olive oil over medium heat. Add the finely chopped vegetables, sprinkle with salt & pepper, and cook for 5 minutes.
d. Separate the dried mushrooms from the hot water (while reserving liquid for later) and finely chop them, discarding any hard pieces. Use the food processor to finely chop the fresh mushrooms (careful not to over blend, you want some texture here).
e. To the pot, stir in the tomato paste, herbs, chopped mushrooms and rehydrated mushrooms. Cook for another 3 minutes, then pour in the reserved mushroom liquid and red wine. Bring to a boil, reduce to a simmer and cook for 10 minutes, until liquid has reduced by half.
f. Strain the excess water from the cashews then add them to a blender. Add 1/4 cup water, lemon juice, salt, nutritional yeast, and miso then blend on high until smooth. Transfer the cream to the pot and stir together until evenly distributed.
g. Bring a large pot of salted water to a boil and prepare the pasta as directed. When pasta is tender, reserve 1/4 cup of the cooking water then strain the rest. Add the cooked pasta and the reserved water to the pot with the bolognese. Stir until evenly coated then serve warm with fresh thyme and cashew parmesan (optional- see notes).
Steak: Juicy Vegan Seitan Steak
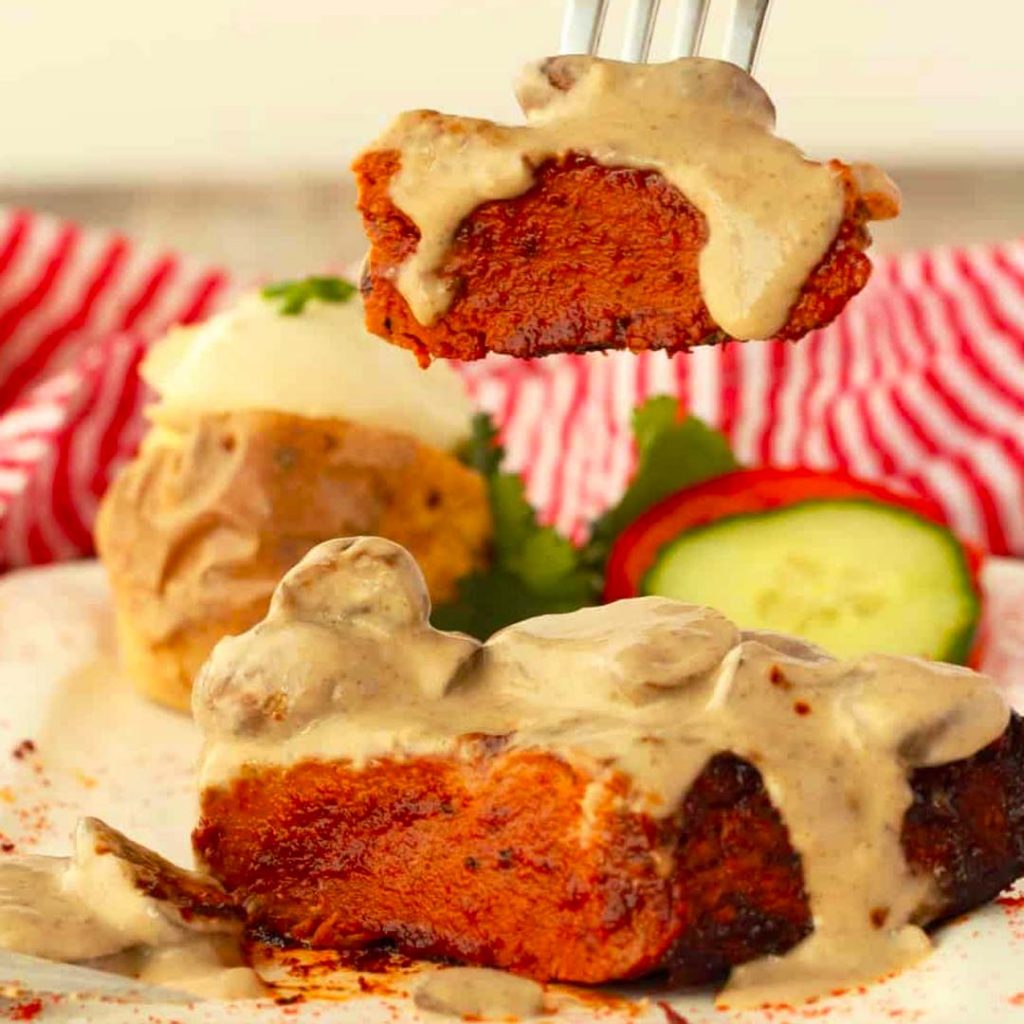
Fill your tummy with super high in protein meal with this juicy vegan seitan steak. It is perfectly spiced and deliciously textured.
INGREDIENTS
For the Vegan Steaks:
3/4 cup (123g) Canned Chickpeas (Drained)
1/4 cup (15g) Nutritional Yeast
1 tsp Garlic Powder
1 tsp Onion Powder
1/4 tsp Cumin
1/4 tsp Coriander Powder
1/2 tsp Oregano
2 Tbsp Soy Sauce
1/2 cup (130g) Tomato Paste
1 tsp Paprika
1/4 tsp Black Pepper
1 Tbsp Dijon Mustard
1/4 tsp Liquid Smoke
1/2 cup (120ml) Vegetable Stock
1 and 3/4 cups (263g) Vital Wheat Gluten*For the Marinade:
1/4 cup (60ml) Soy Sauce
1 tsp Paprika
2 Tbsp Brown Sugar
2 Tbsp Tomato Paste
1/8 tsp Liquid SmokeFor Frying:
1 Tbsp Olive Oil (or other oil)For Serving (Optional):
Baked Potatoes with Vegan Sour Cream
Creamy Mushroom SauceINSTRUCTIONS
Vegan Seitan Steak
a. Add the chickpeas, nutritional yeast, garlic powder, onion powder, cumin, coriander powder, oregano, soy sauce, tomato paste, paprika, black pepper, dijon mustard, liquid smoke and vegetable stock to the food processor and process until well mixed.
b. Transfer to a mixing bowl and add the vital wheat gluten. Stir in with a spoon briefly and then get in there with your hands, mixing it into a dough. Knead the dough for around 2 minutes, you want it to go from sticky and soft to firm and stretchy, so that when you pull it, it snaps back into place. See our full post for lots more info on kneading. Make sure you don’t over-knead it because that will cause your steaks to become very tough.
c. As soon as you have a firm, stretchy texture, flatten it out and cut it into 4 roughly equal sized steaks. Use a potato masher to bash the steaks down a bit to flatten, but don’t do this too much as it counts as kneading, and you don’t want to overdo it.
d. Wrap the steaks individually in tinfoil and then steam them for 20 minutes. Don’t wrap them too tight as they will expand while steaming. You can steam them in a steamer basket over a pot of boiling water, or in any steamer that you have.
e. While the steaks are steaming, prepare your marinade sauce by adding all the ingredients to a bowl and whisking them together. Let it sit for a little while and then whisk again. You want it to be nice and smooth and it can take a couple of minutes for the brown sugar to dissolve properly.
f. After steaming for 20 minutes, unwrap the steaks from their tinfoil and place into a square dish. Pour over the marinade sauce and use a brush to make sure the steaks are properly covered. Turn them over in the sauce a few times.
g. Heat a pan with a little olive oil (or other oil, 1 Tbsp is fine) and then fry the steaks (I found they all fitted into the same pan) flipping them regularly and brushing more marinade sauce on them every time you flip them, until they are nicely browned and caramelized.
h. Serve with a side salad, baked potatoes with vegan sour cream, and if you like sauces with your steaks, then a creamy mushroom sauce goes wonderfully with this!
Dessert: No-Bake Chocolate Cheesecake
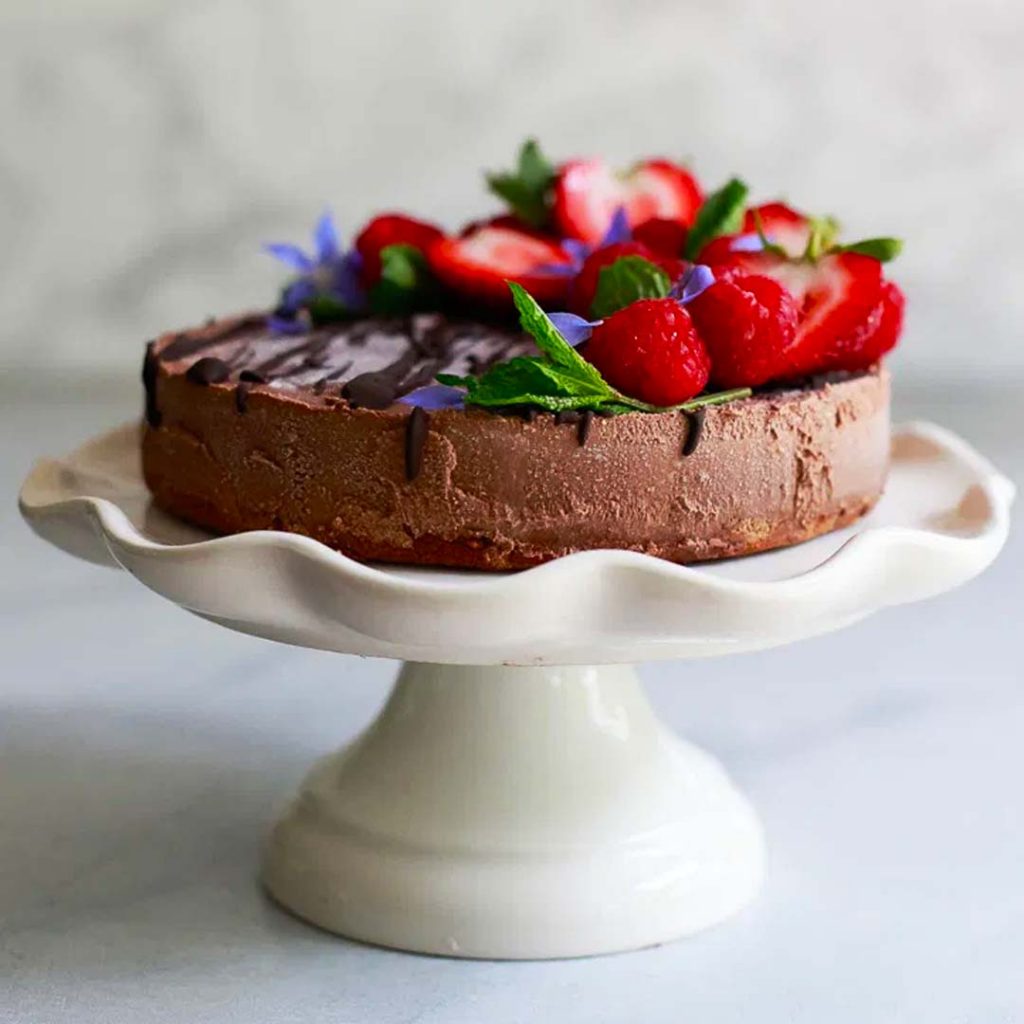
Best served chilled, this no-bake chocolate cheesecake is your mouth-watering dessert to end the night with. It’s dairy-free, gluten-free, paleo, and utterly delicious.
INGREDIENTS
1/2 cup pitted dates
1/2 cup almonds
1/4 cup flaked coconut
1 cup raw cashews, soaked in water overnight (or with boiling water poured over at least 4 hours)
1/8 cup coconut butter
1/6 cup maple syrup
1/2 teaspoon vanilla extract
1/4 cup unsweetened cocoa/cacao powder
pinch sea salt
1/3 cup almond or coconut milk
1/3 cup dairy-free, gluten-free chocolate chunks/chips
1 tablespoon coconut oil
Fresh strawberries and/or raspberries
fresh mintNo-Bake Chocolate Cheesecake
INSTRUCTIONS
a. Coat a 6-inch cake pan with cooking spray. Line the bottom with a round piece of parchment paper for easy removal.
b. To make the crust, place the dates, almonds, and coconut into a food processor. Blend until the mixture comes together when pressed. If your dates are on the dry side, you may need to add a little water. Press the crust mixture into the bottom of the cake pan very firmly with your hands or the bottom of a glass or measuring cup. Set aside and rinse the processor bowl.
c. To make the filling, drain the cashews well and place them into the food processor or blender. Add the coconut butter (you could also use coconut oil), syrup, vanilla, cocoa, salt, and milk. Cover and blend until very smooth and creamy. Add more milk if needed. This takes a few minutes so keep blending until creamy. Pour the filling into the crust. Transfer to the freezer to set up for at least 4 hours or overnight. If completely frozen, let thaw about 30 minutes. Remove the cheesecake from the pan by running a thin knife under hot water and then around the inside of the cake pan.
d. Garnish your vegan chocolate cheesecake with fresh berries, mint, and/or a drizzle of melted dark chocolate and enjoy chilled.
Drinks/Cocktails: Rosé Vodka Cocktail

A go-to drink that is perfect for your night together. It is light and crisp with just the right fruity punch.
Ingredients
1/2 ounce orange liquor (I like Cointreau)
1/2 ounce Aperol
1/2 ounce lemon juice
2 ounces cranberry juice
1 1/2 ounces rosé vodka
1/2 cup crushed ice
lemon peel (for garnish)Instructions
Rosé Vodka Cocktail
a. Add all ingredients to a cocktail shaker.
b. Shake vigorously to mix, and to chill the cocktail (the breaking ice will cool it down).
c. Strain and pour into a cocktail glass. Garnish with a lemon twist (see notes).
d. Serve and enjoy!
Charcuterie board: Tangy Herbed Vegan Cheese Spread
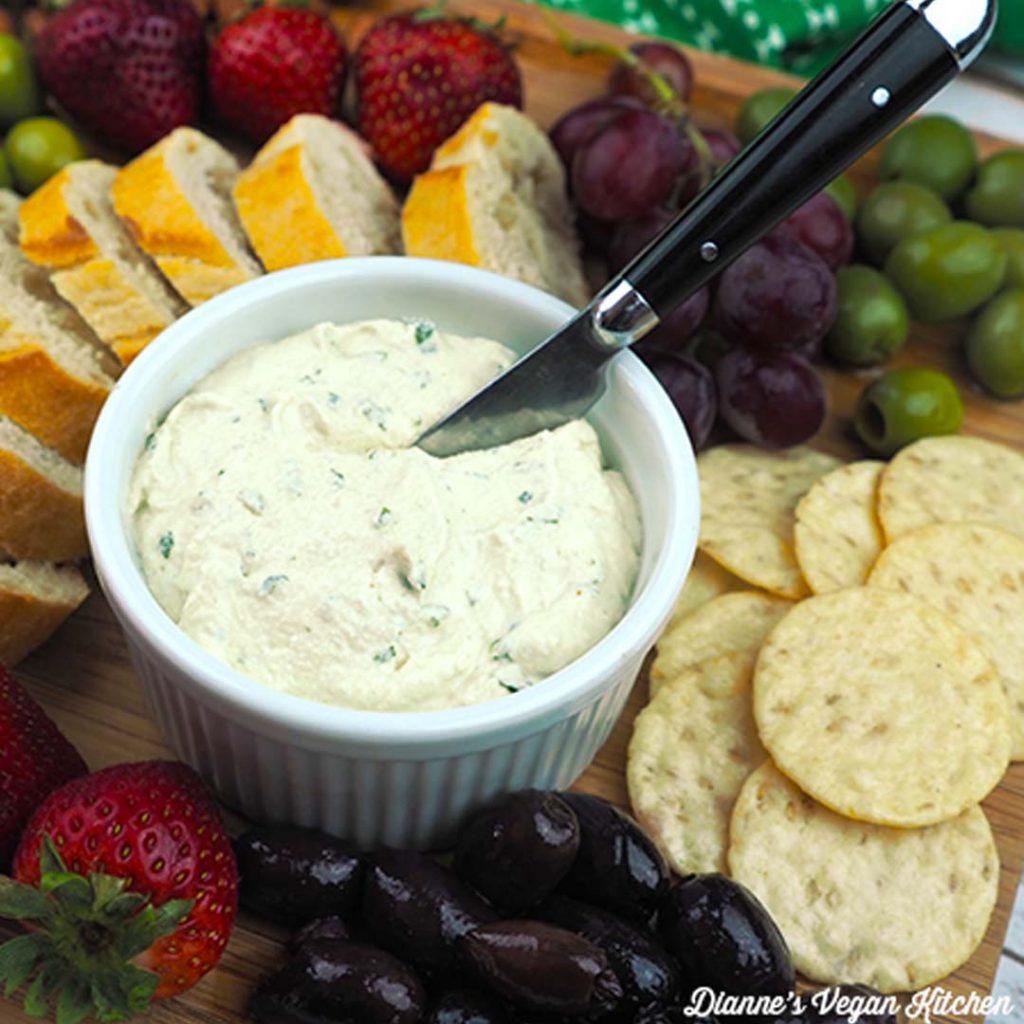
Continue with some hearty snack and indulge yourselves with a charcuterie board filled with dairy-free and gluten-free treat.
Tip: If you happen to be allergic to some of the chosen mixes you can always change it to snacks you like that matches well with vegan cheese spread.
Ingredients
½ cup raw cashews soaked for 2 hours, drained and rinsed
1/2 cup raw macadamia nuts soaked for 8 hours, drained and rinsed
1/3 cup water
1 tablespoons apple cider vinegar
2 tablespoon lemon juice
2 teaspoons mellow white miso
1 clove garlic minced
1/2 teaspoon sea salt
½ teaspoon garlic powder
½ teaspoon onion powder
1 tablespoon chopped chives
1 tablespoons chopped parsleyInstructions
Tangy Herbed Vegan Cheese Spread
a. Mix everything except the chives and parsley in a high-speed blender or food processor. Mix until smooth and creamy, stopping to scrap down the sides if necessary. If the mixture is too thick to blend, add a little more water a tablespoon at a time.
b. Pulse in the chives and parsley.
c. Chill the cheese spread in the fridge for an hour or two before serving.
Enjoy a lovely night together or just yourself and fill your tummy with the right mix of love and warmth.
Over to you…
Your kitchen looking unloved and sad, give it that much needed kitchen lift and visit our showroom. Allow us to help you achieve your dream kitchen even with a little kitchen upgrade and contact us now!
The post Fanciful Romantic Vegan Valentine’s Day Full Course Dinner Meal Recipes appeared first on Cattleya Kitchens.
]]>The post Indian Christmas: 5 Festive Indian Cuisines Fit for the Holidays appeared first on Cattleya Kitchens.
]]>Christmas has been a largely religious holiday that is celebrated with equal fervor by people of every religion. The Indian community has embraced this festivity with the same gusto as the celebration of Diwali, Eid, and Holi.
With influence from the Western culture, the long-prepared Christmas meal is served on Christmas Eve to be shared together by the family. To help you choose what dishes to prepare here 5 festive Indian cuisines you can delight and enjoy you and your guests with:
1. Sanna
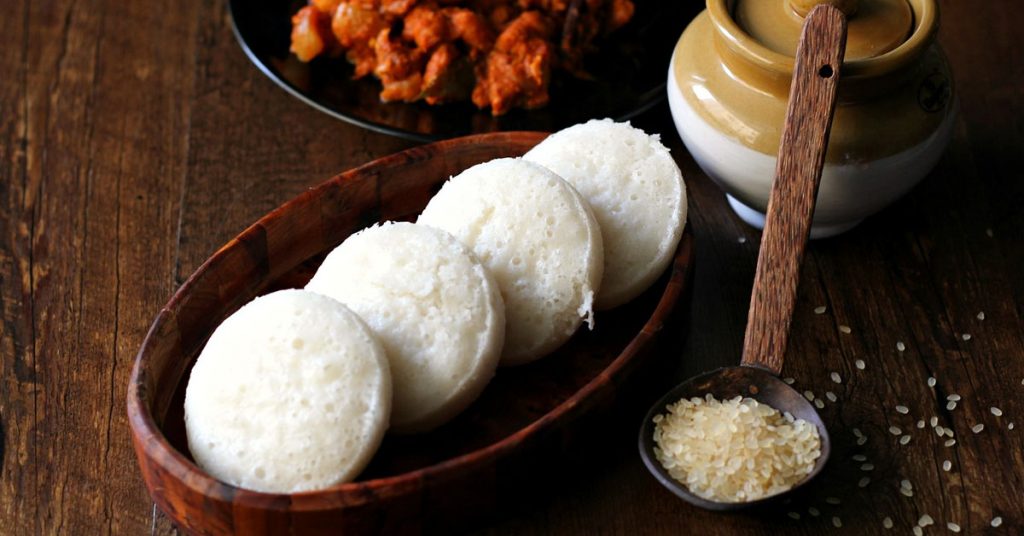
Warm, soft, and fluffy sanna can be eaten on their own or with curries and stir-fries. It is a unique dish that requires specific ingredients.
Ingredients
2 cups (500 grams) rice
2 medium-sized coconuts
1 pint (500 milliliters) Goan toddy or 2 1/2 teaspoons dried yeast
2 teaspoons sugar (to mix with yeast if using)
Salt to taste
4 teaspoons sugar (to add to batter)
1 cup warm water (if using yeast)Indian Sanna Bread
Instructions:
Step 1: Wash the rice well and soak in water overnight. In the morning, drain the water and grind the rice into a fine paste with a little toddy. If you are not using today, grind the rice on its own.
Step 2: Scrape the coconut out of the shell and grind it into a paste too.
Step 3: If you are using the yeast, mix it with 2 teaspoons of sugar and the warm water. Stir well. Allow to sit for a few minutes and it will begin to rise.
Step 4: Mix the rice and coconut pastes together in a large, deep bowl and add the toddy/ yeast water. Mix well to form a thick batter.
Step 5: Allow this batter to ferment for 4 to 5 hours.
Step 6: Grease an Idli stand (or small ramekin dishes with a little cooking oil and pour enough batter into the mold/ramekin dishes to fill about 3/4 of the way.
Step 7: Put the Idli stand/ ramekin dishes into a steamer and steam for 20 minutes at least (or till cooked – a toothpick inserted in the center will come out clean) on high flame.
Step 8: When cooked, gently remove from the Idli molds/ramekin dishes and serve hot with a curry of your choice.
2. Malai Kofta

Malai kofta may be a tedious meal to prepare but the efforts are well-rewarded as it is both pleasing to vegetarians and meat-eaters alike who will ask for more. It is the perfect mixture of traditional spices that are deep-fried made from potato and paneer dunked in a creamy spiced velvety smooth curry.
It is best served with garlic naan for an ultimate indulgence.
Ingredients:
Gravy
1 tablespoon oil 15 ml, I used avocado oil
1 bay leaf
1 inch cinnamon stick
4 whole green cardamoms slightly crushed
3 cloves
1 teaspoon shahi jeera caraway seeds
6-7 large garlic cloves 22 grams, roughly chopped
1.5 inch ginger 16 grams, roughly chopped
1 green chili chopped
1 large yellow onion 190 grams, chopped
2 large tomatoes 390 grams, chopped
12 cashews whole and raw
2 cups water 16 oz
2 tablespoons butter 28 grams
1 teaspoon oil 5 ml
1 teaspoon coriander powder
1/4 teaspoon kashmiri red chili powder
1/2 teaspoon salt or to taste
1 teaspoon sugar
1/8 teaspoon garam masala or more to taste
2 teaspoons crushed kasuri methi dried fenugreek leaves
3 tablespoons heavy cream 45 ml
pinch cardamom powder
cilantro to garnish
Malai Kofta
1 cup mashed & boiled potatoes
1 cup grated paneer
1 tablespoons finely chopped ginger
1.5 tablespoons chopped cilantro
1 green chili chopped
1 tablespoon chopped cashews
1 tablespoon chopped raisins golden raisins
1.5 tablespoons cornstarch
1/2 teaspoon salt
1/4 teaspoon white pepper powder
1/4 teaspoon cardamom powder
oil for frying, I used sunflower oil
Instructions:
Make the gravy/curry
Step 1: Heat a pot/pan on medium heat. Once hot, add 1 tablespoon oil and then add the bay leaf, cinnamon, green cardamom, cloves and shahi jeera.
Step 2: Let the spices sizzle for few seconds and then add the chopped garlic, ginger, green chili and onion.
Saute for around 2 minutes, do not brown the onion.
Step 3: Then add the tomatoes along with cashews and 2 cups of water and stir.
Step 4: Cover the pot with a lid and cook for around 10 to 12 minutes until tomatoes soften.
Step 5: Let it cool down down a bit (around 15 minutes, if you blend it while it’s hot it might blow off from the blender), then discard the bay leaf and transfer mixture to a blender.
Blend to a smooth paste. Use a strainer and strain the puree into another bowl. This makes sure the gravy is really smooth.
Step 6: Put the same pan on medium heat again. Once hot, add 2 tablespoons unsalted butter and 1 teaspoon oil. Let the butter melt.
Step 7: Add in the pureed gravy and cook for 2 minutes. Then add the coriander powder, kashmiri red chili powder, salt, sugar and garam masala.
Let the curry cook for 2 to 3 minutes.
Step 8: Add crushed kasuri methi and then cream. Cook for additional 2 to 3 minutes on medium-low heat. Sprinkle some cardamom powder on top. The gravy is now done. Set aside and make kofta.Malai Kofta
Make the kofta
Step 1: Boil the potatoes using a pressure cooker, 8-9 whistles on a stove-top pressure cooker. You can do this on the side while making the gravy.
Once the potatoes are boiled, let them cool a bit then peel and mash them.
Step 2: To a large bowl, now add all ingredients for kofta- boiled and mashed potatoes, grated paneer, finely chopped ginger, cilantro, green chili, cashews, raisins, cornstarch, salt, white pepper powder and 1/4 teaspoon cardamom powder.
Step 3: Mix everything together with your hands to form a dough. Start making koftas from the dough. Take some part of the dough and roll between your palms to make it round.
Step 4: Similarly makes all the koftas. I made 9 koftas, each around 40 to 42 grams.
Step 5: Heat enough oil to fry in a kadai on medium-high heat. Make sure oil is hot, else koftas can stick to the pan and also disintegrate in the oil.
Drop koftas in hot oil and fry until golden brown from both sides. Remove the fried koftas on a paper towel. You can also shallow fry them, just press the koftas and flatten them like a burger tikki and shallow fry.
Serve the malai kofta
Step 1: To serve place koftas on plate and top with the gravy. Garnish with cream and cilantro. Or you can also place the gravy first on the serving plate, drizzle with cream and place koftas on top.
If you like melt in mouth koftas, it’s also a good idea to let the koftas simmer in the gravy for 2 minutes before serving.
If you prefer the koftas to be on the crispier side, then add gravy on top only before serving.
Enjoy malai kofta with naan or rice!
3. Dhaba Style Matar Paneer
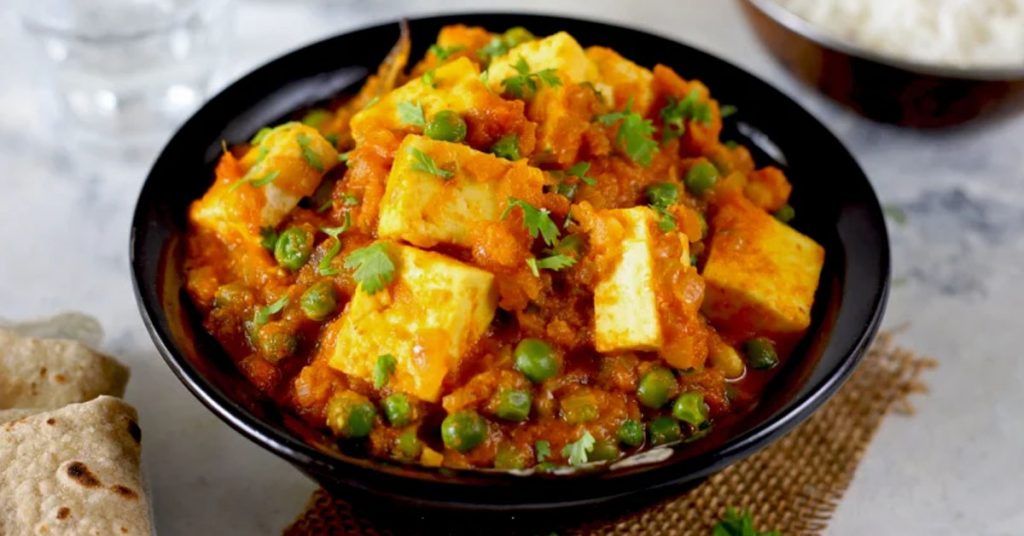
A popular Indian curry dish, Matar paneer is a North Indian cuisine made with green peas and cottage cheese. It is also one of the frequently ordered vegetarian dishes.
Ingredients
For Masala Paste
1 teaspoon cumin seeds
60 grams onion or ⅓ cup chopped onion
1 green chili – chopped
1 inch ginger – chopped
5 medium garlic cloves – chopped
2 tablespoons chopped coriander leaves (cilantro leaves)
215 grams tomatoes or 3 medium tomatoes or 1 cup chopped tomatoes
1 teaspoon coriander seeds
1 inch cinnamon
2 green cardamoms
5 whole black peppers
3 cloves
12 cashews
For Gravy
3 to 4 tablespoons oil
¼ teaspoon turmeric powder (ground turmeric)
1 teaspoon kashmiri red chili powder or deghi mirch
1 cup green peas fresh or frozen
2 to 2.25 cups water or add as required
200 to 250 grams Paneer – cubed (cottage cheese)
½ inch ginger – julienne
½ teaspoon crushed kasuri methi (dry fenugreek leaves)
¼ teaspoon Garam Masala Powder
3 tablespoons low fat cream
3 tablespoons chopped coriander leaves (cilantro leaves)
salt as required
Instructions
Making Masala Paste
Step 1: In a grinder jar, add 1 teaspoon cumin seeds, ⅓ cup chopped onion, 1 green chili (chopped), 1 inch ginger, (chopped) and 5 medium garlic cloves (chopped).
Step 2: Add 2 tablespoons chopped coriander leaves and 1 cup chopped tomatoes.
Step 3: Then add 1 teaspoon coriander seeds, 1 inch cinnamon, 2 green cardamoms, 5 black peppers and 3 cloves.
Step 4: Add 12 cashews. You can even soak cashews in hot water for 30 minutes. Drain all the water and then add.
Step 5: Grind to a smooth paste without adding any water. If required you can add 2 to 3 tablespoons of water while grinding.Dhaba Style Matar Paneer
Making Dhaba Style Matar Paneer
Step 1: Heat 3 to 4 tablespoons oil in a heavy pan. Then add the ground masala paste.
Step 2: On a low to medium-low flame begin to saute the paste.
Step 3: Keep on sautéing and stirring often till the paste thickens and you see oil leaving the sides of the paste.
Step 4: The color of masala will also change and you will clearly see the oil releasing from the paste.
Step 5: Then add ¼ teaspoon turmeric powder, 1 teaspoon kashmiri red chili powder or deghi mirch.
Step 6: Mix the spice powders very well with the masala.
Step 7: Add 1 cup green peas. You can use fresh or frozen green peas. Mix the peas with the masala.
Step 8: Then add 2 to 2.25 cups water or add as required. Season with salt as required. Mix very well.
Step 9: Cover the pan with its lid and simmer the matar gravy on a medium-low to medium flame till the peas are cooked.
Step 10: Do check when the peas are cooking and if required add some more water.
Step 11: Check the doneness of peas by pressing them with a spoon and they should get mashed easily.
Step 12: Then add ¼ teaspoon garam masala powder.
Step 13: Add ½ teaspoon kasuri methi (crushed).
Step 14: Add 200 to 250 grams paneer (cubed). Mix and cook for a minute.
Step 15: Then add ½ inch ginger (julienne) and 3 tablespoons low fat cream.
Step 16: Mix very well. Switch off the flame.
Step 17: Then lastly add 3 tablespoons chopped coriander leaves. Mix again.
Step 18: Serve matar paneer with chapatis, tandoori rotis, naan, lachcha paratha, pudina paratha or steamed rice or jeera rice.
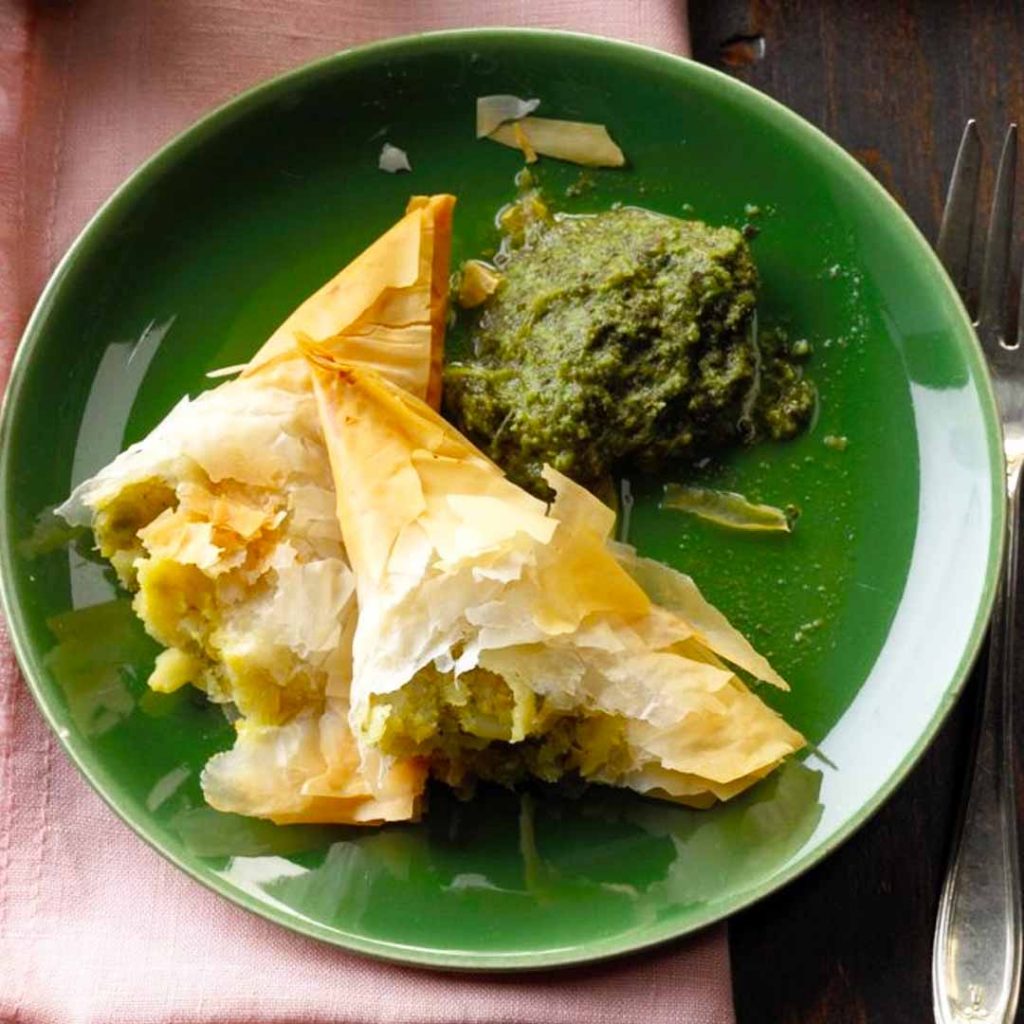
4. Vegetable Samosas

A perfect snack any time, vegetable samosas are packed with flavour that every member of the family will surely enjoy. It can be good as an appetizer or as a side dish that matches with a curry-based recipe.
Ingredients
1 tbsp vegetable oil
1 onion, finely chopped
2 garlic cloves, crushed
1 potato (about 150g) finely diced
1 carrot (about 100g) finely diced
100g frozen peas
2 tsp curry powder or your own spices according to taste
100ml vegetable stock
For the pastry
225g plain flour
2 tsp sea salt
2 tbsp vegetable oil
2l vegetable oil to deep fryVegetable Samosas
Instructions:
STEP 1: To make the filling, heat the oil in a frying pan, add the onion and garlic, mix in the spices and fry for 10 mins until soft. Add the vegetables, seasoning and stir well until coated. Add the stock, cover and simmer for 30 mins until cooked. Leave to cool.
STEP 2: To make the pastry, mix flour and salt into a bowl. Make a well in the centre, add the oil and 100ml water to make a firm dough. Knead the dough on a floured surface for 5-10 mins until smooth and roll into a ball. Cover in cling film and set aside at room temperature for 30 mins.
STEP 3: Divide the pastry into 12 equal pieces. Roll each piece into a ball and roll out into a circle of 15cm. Divide this circle into two equal pieces with a knife.
STEP 4: Brush each edge with a little water and form a cone shape around your fingers, sealing the dampened edge. Fill with 1 tbsp mixture and press the two dampened edges together to seal the top of the cone. Repeat with the remaining pastry.
STEP 5: Heat the oil in a large deep saucepan to 180C. The oil should come 1/3rd of the way up the pan. Deep fry the samosas in batches for 8-10 mins until crisp and brown. Take out and drain on kitchen paper.
5. Kheer
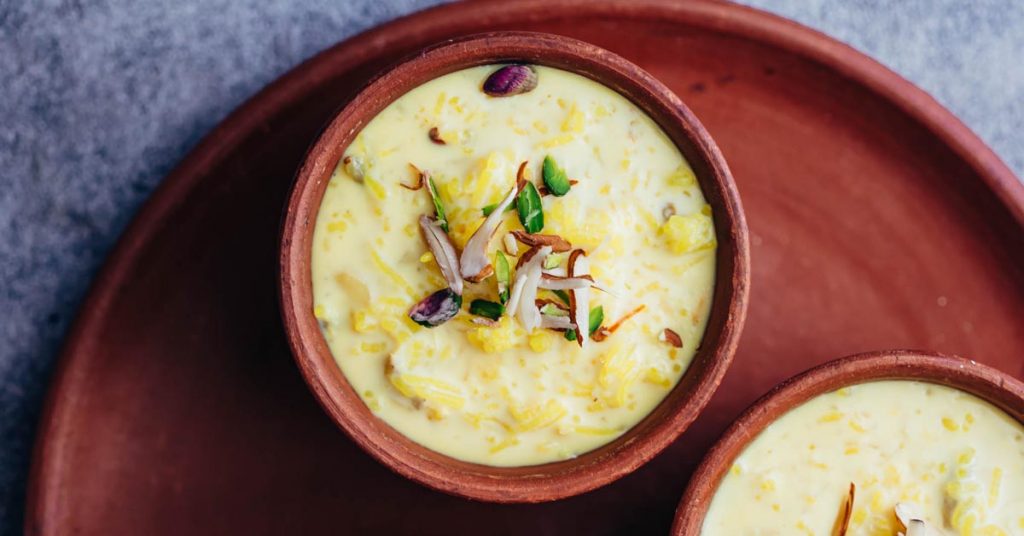
A traditional Indian dessert, kheer is made from rice, vermicelli, or cracked wheat. It is served with raisins and different kinds of nuts that can be enjoyed by every member of the family.
Ingredients to Make Kheer
2 cups whole milk
2 cups coconut milk
3 tbsp white sugar
1 cup Basmati rice
1⁄2 tsp ground cardamom
1⁄4 cup raisins
Optional: 1⁄2 tsp rose water, 1⁄4 cup sliced almonds and 1⁄4 cup pistachios, chopped.Kheer
Instructions
Step 1: In a medium non-stick pot, combine the milk, coconut milk and sugar and bring to a boil.
Step 2: Next, add the rice to the pot and simmer over low heat for 20 minutes, stirring occasionally.
Step 3: Once the mixture begins to thicken, use a whisk to stir in the cardamom.
Step 4: Stir in the raisins and optional rose water. Cook for another 5-10 minutes. Once the mixture begins to thicken again, remove from the heat.
Step 5: Decorate with nuts if you like. Enjoy your kheer warm or cold!
You can also add in Diwali snacks on this special occasion to make it merrier.
Whoever and wherever you are, allow yourself to feel the warmth of Christmas and serve you and your guests with one of these hearty meals pride from the Indian culture. Happy holidays!
Over to you…
Your kitchen looking a bit moldy and not functional? Allow us to turn your kitchen into the most convenient and functional kitchen and send us a message. Let us start working on achieving your dream kitchen together.
The post Indian Christmas: 5 Festive Indian Cuisines Fit for the Holidays appeared first on Cattleya Kitchens.
]]>The post Christmas in the UK: 5 Yummy Vegan Dinner Recipe Best Served During the Holidays appeared first on Cattleya Kitchens.
]]>- Smoky Vegan Black Bean Soup
- Vegan Creamy Linguine with Wild Mushrooms
- Vegan Shepherd’s Pie
- Gluten-free Chocolate Ganache Tart
- Easy Vegan Eggnog
The season of gift-giving made especially for children, Christmas has been a long-celebrated tradition in every household. In the UK, Christmas Day is when families come together; enjoy a hearty dinner feast while watching the Queen’s speech.
This year’s Christmas will be a bit different for some due to the current situation but the festivities are still observed and with that, here are 5 vegan dinner recipes you can prepare for the whole family (limited to family members who live with you) or just yourself (via zoom party):
1. Smoky Vegan Black Bean Soup
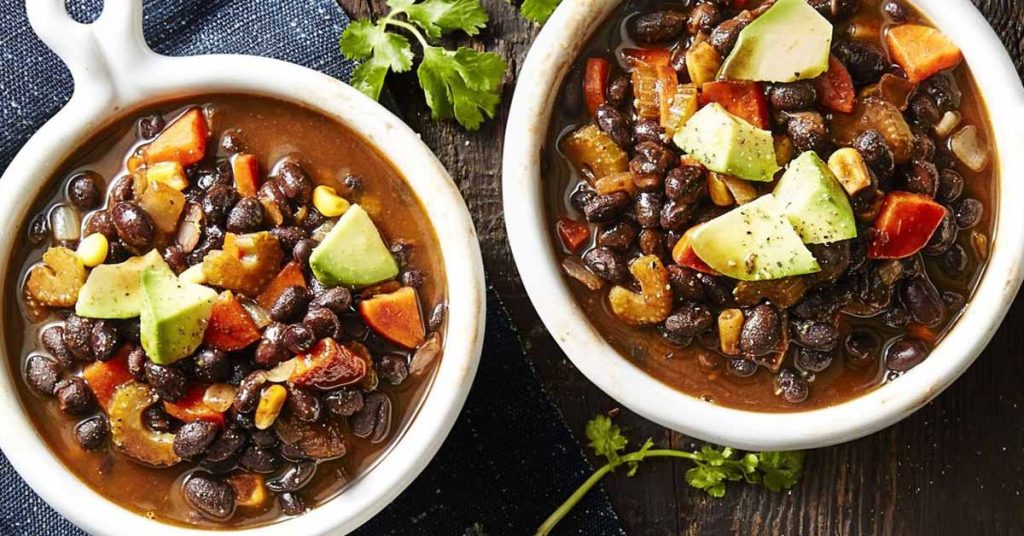
Start your hearty meal with a warm healthy soup with smoky vegan black bean soup. It is packed with nutritious ingredients that are not only good for you but will definitely keep you craving for more.
Ingredients
2 tbsp extra virgin olive oil
2 medium carrots, chopped
2 stalks celery, sliced
1 medium onion, finely chopped
¼ cup tomato paste
3 cloves garlic, crushed with press
1 ½ tsp ground cumin
3 cups lower-sodium vegetable or chicken broth
15 oz (approx 3 cans) lower-sodium black beans, undrained
1 cup frozen corn
Avocado chunks and cilantro leaves, for servingSmoky Vegan Black Bean Soup
Directions
a. In a skillet, heat oil on medium-high. Add carrots, celery and onion. Cook 6 to 8 minutes or until starting to brown, stirring occasionally.
b. Add tomato paste, garlic and cumin. Cook, stirring, 1 to 2 minutes or until garlic is golden and tomato paste has browned. Stir in 1/2 cup broth, scraping up any browned bits from the sides.
c. Transfer contents of skillet to slow-cooker bowl along with beans, corn and remaining broth.
d. Cover and cook on High for 4 hours or Low for 6 hours. Serve with avocado and cilantro.
2. Vegan Creamy Linguine with Wild Mushrooms
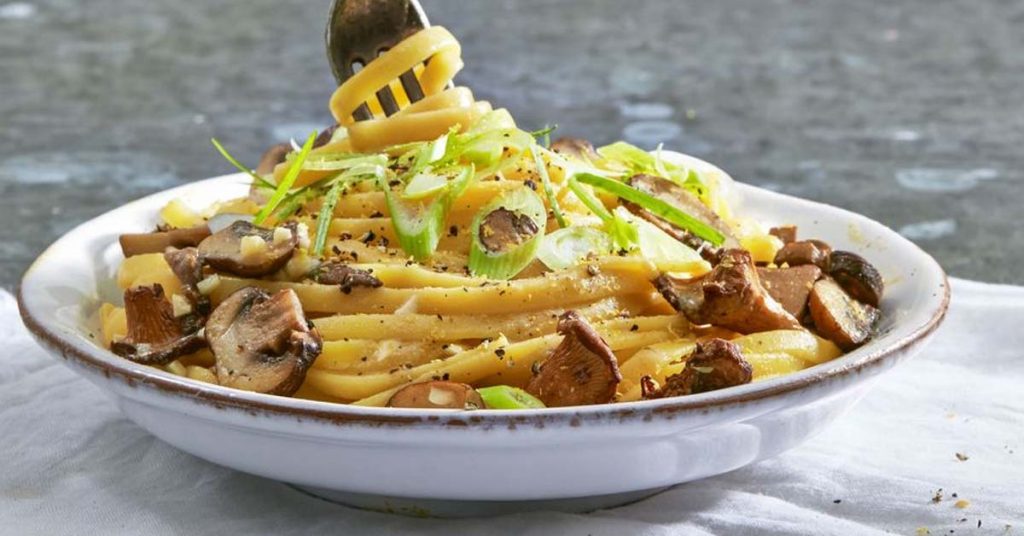
Creamy flavoured pasta that will also entice kids to eat their vegetables. This vegan creamy linguine with wild mushrooms is your garlicky pasta that is oh so good which is also nutritious.
Ingredients
1 lb. linguine or fettuccine
6 tbsp. olive oil
12 oz. mixed mushrooms, thinly sliced
3 cloves garlic, finely chopped
1/4 c. nutritional yeast
2 green onions, thinly sliced on an angleCreamy Vegan Linguine with Wild Mushrooms
Directions
a. Cook linguine as label directs, reserving 3/4 cups pasta cooking water before draining. Return drained linguine to pot.
b. Meanwhile, in 12″ skillet, heat oil on medium-high. Add mushrooms and garlic; cook 5 minutes or until mushrooms are browned and tender, stirring.
b. Transfer to pot with cooked, drained linguine along with nutritional yeast, reserved cooking water, 1/2 teaspoon salt and 3/4 teaspoon coarsely ground pepper. Toss until well combined. Garnish with green onions.
3. Vegan Shepherd’s Pie
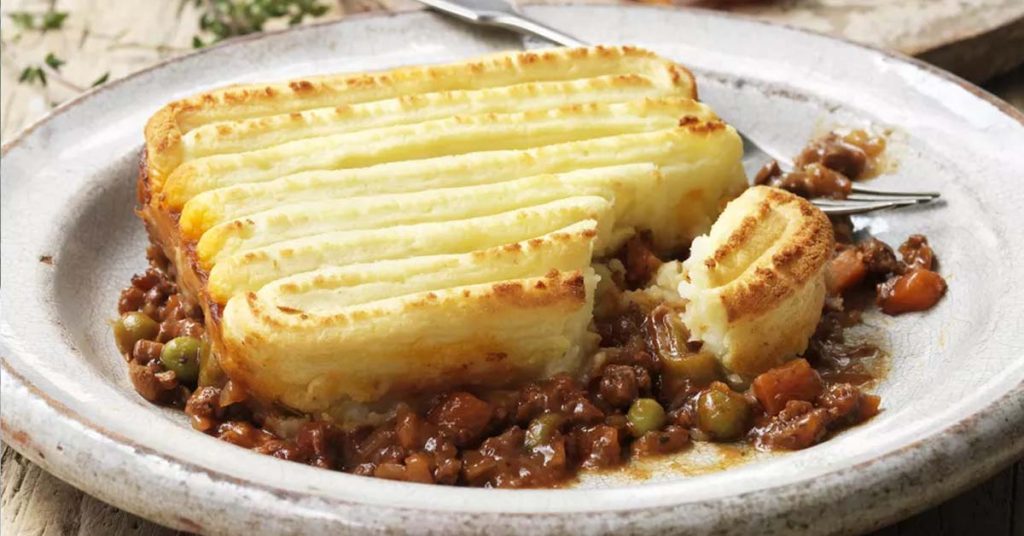
A staple British food now made with a meat substitute suitable for vegetarians, vegans, and omnivore diets alike. A satisfying hearty meal made with green peas, gravy, and corn.
Ingredients
4 potatoes (chopped)
2 tablespoons margarine
1/4 cup soy milk
Salt and pepper (to taste)
1 onion (diced)
1 tablespoon vegetable oil
1 1/2 cups vegetarian ground beef substitute (or rehydrated TVP; see recipe tips below)
1 1/4 cups vegetarian gravy
1/2 cup green peas
1/2 cup corn
1/2 teaspoon garlic powder
Dash of cayenne pepperVegan Shepherd’s Pie
Direction:
a. Pre-heat oven to 350 F.
b. Boil or microwave the potatoes until soft. Drain and mash with the margarine and soy milk. Add a bit of salt and pepper, to taste.
c. Sauté the onion for a few minutes, until tender, in the vegetable oil.
d. In a large mixing bowl, combine the onions, beef substitute or rehydrated TVP, vegetarian gravy, peas, corn, garlic powder, and cayenne. Pour into a pie pan or baking dish.
e. Spread the mashed potatoes over the veggie mixture.
f. Bake for 30 to 40 minutes until heated through.
4. Gluten-free Chocolate Ganache Tart
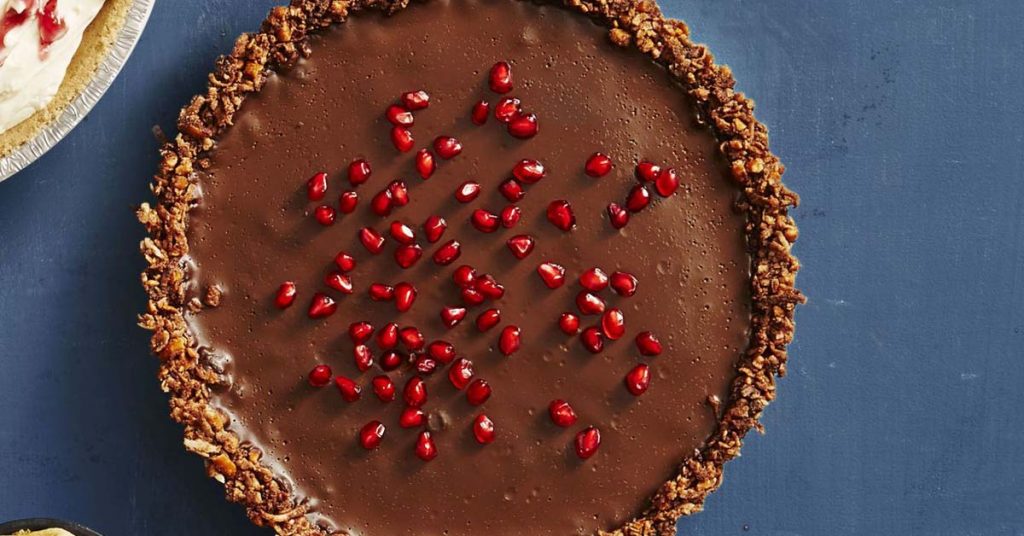
Serve your guest with the right mix of fruit and dark chocolate with our Gluten-free chocolate ganache tart to end your holiday on a sweet note.
Ingredients
1 c. shredded sweetened coconut
1 c. salted gluten-free pretzels, crushed into small pieces
1/2 c. rice flour
1/2 c. coconut oil, melted
3 tbsp. brown sugar
2 tbsp. unsweetened cocoa
1 c. coconut milk
6 oz. vegan dark chocolate, finely chopped
Pomegranate seeds, for garnish (optional)Gluten-Free Chocolate Ganache Tart
Directions
a. Preheat oven to 375°F. Grease 9″ tart pan with removable bottom.
b. In large bowl, combine shredded coconut, pretzels, rice flour, coconut oil, sugar, and cocoa. Transfer to prepared tart pan. With hands, firmly press mixture into bottom and up side of pan in even layer; place on cookie sheet. Bake 10 minutes. Cool completely on wire rack.
c. In small saucepan, heat coconut milk on medium until just bubbling at edges, whisking occasionally. Place chocolate and pinch salt in medium heatproof bowl. Pour hot coconut milk over chocolate. Let stand 5 minutes. Gently whisk until smooth. Pour into tart shell. Refrigerate, uncovered, 2 hours or until set.
d. To serve, top with pomegranate seeds, if desired. Can be made up to 2 days ahead. Once set, cover with plastic and keep refrigerated.
5. Easy Vegan Eggnog

This easy-to-make vegan eggnog is your comforting hot drink after your hearty meal to keep the merriment going until the end of the night. No worries, this vegan eggnog does not have any eggs which can be substituted with a little tofu and soymilk.
Take a quick drink of a classic holiday beverage made for vegans that even non-soy milk lover will change their mind and ask for a second sip.
Ingredients
EGGNOG
3 cups dairy-free milk (preferably homemade // we love a cashew-almond blend — see instructions)
1 14-oz can full-fat coconut milk (use light for lighter eggnog)
4-6 Tbsp maple syrup, plus more to taste (substitute up to half with coconut sugar)
1/2 tsp ground cinnamon, plus more to taste
1/4 tsp ground nutmeg, plus more to taste
1 tsp pure vanilla extract
1/8 tsp ground cardamom (optional)
FOR SERVING optional
1 ounce bourbon (per 8-ounce serving)
Coconut whipped cream
Cinnamon or nutmegEasy Vegan Eggnog
Instructions
a. Optional: If making your own dairy-free milk, soak nuts of choice overnight in cool water or cover with hot water and soak for 1 hour. Then drain, rinse well, and add to a high speed blender along with desired amount of filtered water (for a creamier milk, we went with 3/4 cup (90 g) raw soaked cashews, 3/4 cup (95 g) raw soaked almonds, and 4 cups (946 ml) water as the recipe is written; adjust amounts as needed if adjusting serving size). Strain through a nut milk bag and set aside.
b. To a high-speed blender, add 3 cups (710 ml) dairy-free milk (as recipe is written, adjust amounts as needed if adjusting serving size), coconut milk, maple syrup (starting with the lesser amount), cinnamon, ground nutmeg, vanilla extract, and cardamom (optional).
c. Blend on high until creamy and smooth — 1-2 minutes. Then taste and adjust flavor as needed, adding more spices for warmth or maple syrup for sweetness.
d. For serving, enjoy cold, over ice, or hot by heating over medium heat until warm (we prefer chilled, no ice). Optionally, you can add 1/2 – 1 ounce bourbon per 1 cup (8-ounce) serving. This is optional, but a festive addition! Serve as is or with coconut whipped cream and a pinch more cinnamon or nutmeg.
e. Transfer remaining eggnog to a jar for storing. Leftovers should keep in the refrigerator up to 4-5 days. Or freeze into ice cubes and store up to 1 month. Shake well before serving — a little separation is natural.
You can also add immuno-boosting snacks into your meal and enjoy your time together.
We know times are tough but always be reminded that after a rainstorm a beautiful rainbow will always great you. Happy holidays!
Over to you…
Been thinking of renovating your kitchen? Let us be a part of your dream kitchen journey and send us a message.
The post Christmas in the UK: 5 Yummy Vegan Dinner Recipe Best Served During the Holidays appeared first on Cattleya Kitchens.
]]>The post Happy Diwali: 5 Easy to Make Diwali Snack Recipes appeared first on Cattleya Kitchens.
]]>Celebrate the Festival of Lights with the right snack and stuff you and your guests’ tummy with delicious treats that will bring happiness into their life.
Here are 5 easy to make snacks you can magically create in your kitchen this celebration of Diwali.
1. Samosas (Baked instead of Fried)
This ancient treat can be cooked in under an hour which makes it the perfect triangular snack for you and your family.
Note: These savory pastry pockets can be stuffed with spices like coriander, pepper, and caraway seeds.
Ingredients
2 large potatoes, peeled and cubed
1 medium onion, chopped
2 tablespoons olive oil
2 garlic cloves, minced
1 teaspoon salt
1 teaspoon curry powder
1/2 teaspoon ground cumin
1/4 teaspoon pepper
1 cup canned garbanzo beans or chickpeas, rinsed, drained and mashed
1 cup frozen peas, thawed
2 tablespoons minced fresh cilantro
1 package (16 ounces, 14×9-inch sheet size) frozen phyllo dough, thawed
Cooking spray
Mint chutney, optionalSamosas
Directions
a. Place potatoes in a large saucepan and cover with water. Bring to a boil. Reduce heat; cover and cook for 15-20 minutes or until tender. Drain. Mash potatoes; set aside.
b. In a large skillet, saute onion in oil until tender. Add the garlic, salt, curry powder, cumin and pepper; cook 1 minute longer. Remove from the heat. Stir in the mashed potatoes, garbanzo beans, peas and cilantro.
c. Place 1 sheet of phyllo dough on a work surface with a short end facing you. (Keep remaining phyllo covered with a damp towel to prevent it from drying out.) Spray sheet with cooking spray; repeat with 1 more sheet of phyllo, spraying the sheet with cooking spray. Cut into two 14×4-1/2-in. strips.
d. Place 2 tablespoons of filling on lower corner of each strip. Fold dough over filling, forming a triangle. Fold triangle up, then fold triangle over, forming another triangle. Continue folding, like a flag, to the end of the strip.
e. Spritz end of dough with spray and press onto triangle to seal. Turn triangle and spritz top with spray. Repeat with remaining phyllo and filling.
f. Place triangles on greased baking sheets. Bake at 375° for 20-25 minutes or until golden brown. If desired, serve with mint chutney.
2. Masala Vada

This crispy, very flavourful, and addictive Masala Vada is like traveling to the South of Indian Street Stalls and Restaurants and enjoy a super delicious treat perfect for any occasion.
Best served with a cup of tea as an evening snack.
Ingredients
2 cup CHANNA DAL
0.50 tbsp FENNEL SEED
1 no GREEN CHILIES
2 no DRY RED CHILIES
1 tsp GINGER GRATED
1 inch CINNAMON STICK
1 cup ONION CHOPPED
2 cups OIL (for deep frying)
0.25 tsp HING OR ASAFOETIDA
1 tsp SALTMasala Vada
Instructions
a. Soak the channa dal in cold water for about 5 hours and drain the water completely.
b. Grind fennel seeds, cinnamon stick, green chilies, red chilies, ginger to a coarse paste first.
c. Add channa dal and grind it together with spices to a coarse paste (this step helps to blend and mix the spices with channa dal without staying as it is or getting stuck in between while grinding.
d. In a medium bowl add grounded channa dal mixture, chopped onion, salt, hing (asafoetida) and mix well.
e. Divide the batter into small portions and roll it into the ball shape. Press in between the palms and make a patty.
f. Deep fry it in a medium flame until the color changes into golden brown.
3. Soya Hara Bhara Kebab
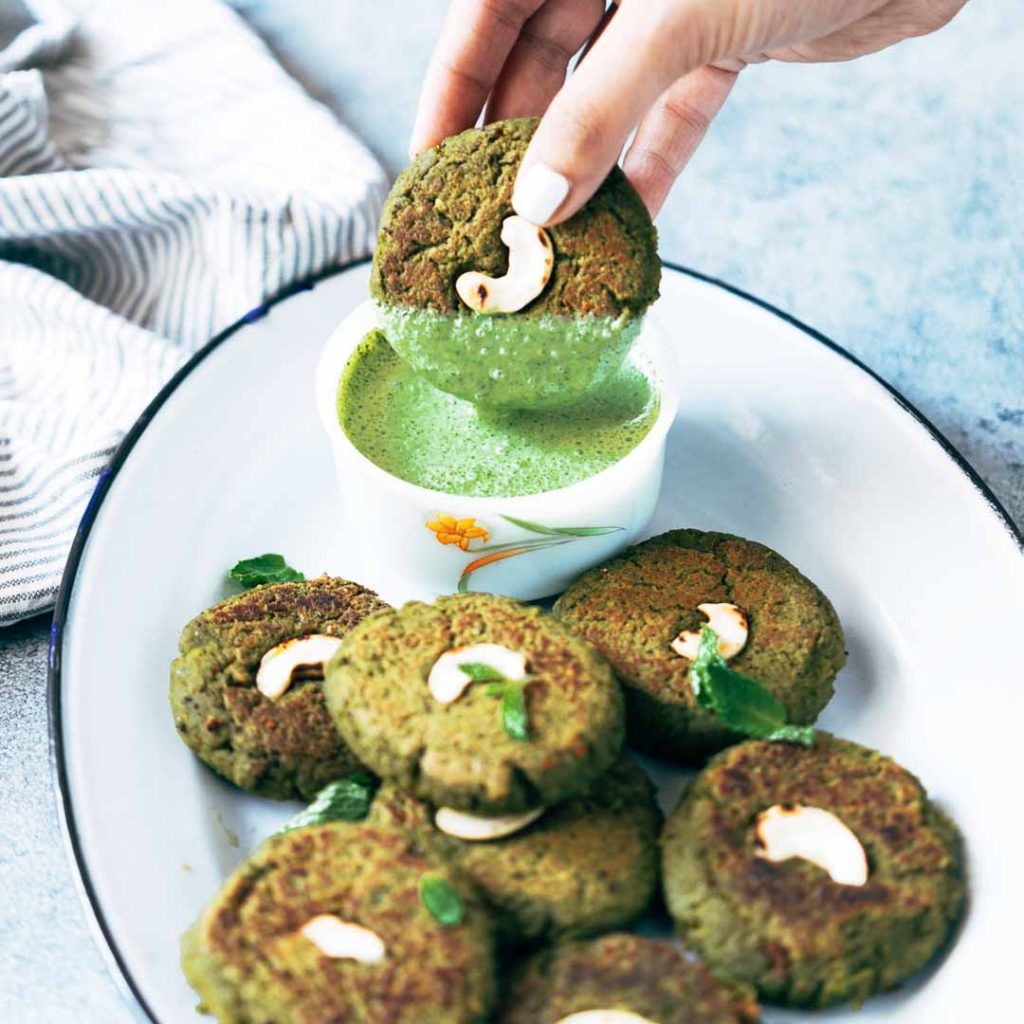
Turn your favourite style hara bhara kebabs with this healthy twist that is perfect for everyone and will surely have them asking for seconds.
Eat a lot but not gain a lot as they are fat-free and your guilt-free snack.
Ingredients
1 cup Soya Granules
1 Green Chilli chopped
1 teaspoon Ginger Paste
1 teaspoon Garlic Paste
1 cup Green Peas
2 cups Spinach chopped
1 teaspoon Chaat Masala
2 tablespoons Chickpea Flour or Besan
1 1/2 teaspoon Salt
3 tablespoons Oil dividedHara Bhara Kebab
Instructions
a. Soak the soya granules in hot water and set aside.
Heat a tablespoon of oil in a pan and add green chillies, ginger and garlic. Saute for a minute till fragrant and add green peas and salt. Cover and cook for 8-10 minutes till the peas are cooked.
b. Add spinach and raw mango powder (amchoor) and saute for 2-3 minutes till the spinach wilts completely. Set aside to cool.
c. In another pan, dry roast the chickpea flour (besan) till a nutty aroma comes out and the flour is a light brown. Be careful not to burn the flour.
d. Strain the soya granules, squeeze out the water completely and add them to a mixer grinder, along with the green peas and spinach mixture. Pulse a few times till the mixture is mixed through but still coarse. Transfer it to a bowl and mix in the roasted chickpea flour (besan). Form the mixture into tikkis or flat circles (like in the picture) and set aside.
e. Heat the remaining oil in a non stick pan, and add 4-5 tikkis or as many that fit into the pan without crowding. Cook them on either side for 5-8 minutes till golden brown. Repeat with the remaining tikkis. Serve hot with mint coriander chutney and ketchup.
4. Rava Laddu

Rava Laddu, a popular Indian sweet that is also called Sweet Semolina Balls. This recipe is made without sugar syrup (or pak) which makes this one a foolproof treat for your occasion.
Ingredients
For Roasting Rava
1 tablespoon ghee (clarified butter)
1 cup heaped fine rava (sooji or semolina) or 185 grams rava
6 tablespoons fresh grated coconut or desiccated coconut
Other Ingredients
½ cup sugar – 120 grams or add as per taste
3 tablespoons ghee (clarified butter)
3 tablespoons chopped nuts like cashews, almonds, pistachios
1 tablespoon golden raisins
½ teaspoon cardamom powder – or 5 to 6 green cardamoms seeds crushed to a powder in a mortar-pestle or coffee grinder
Instructions
Roasting Rava
a. Heat 1 tablespoon ghee in a heavy pan or kadai. Keep the flame to medium and let the ghee melt.
b. Once the ghee has melted, lower the flame and add 1 heaped cup fine rava. use the fine variety of rava.
c. Mix rava very well with the ghee. stir often and begin to roast rava on a low flame.
d. Continue to roast rava till the rava become fragrant and changes its color. No need to brown the rava. The texture will also appear crumbly, loose and light. Roasting rava takes about 10 to 12 minutes on a low flame.
e. Once the rava becomes hot, then you have to stir non-stop so that the rava does not get browned or burnt.
f. Once the rava is roasted well, then add 6 tablespoons grated fresh coconut. You can also add desiccated coconut instead of fresh coconut.
g. Stir and roast for about one to two minutes on a low flame.
h. Now keep the pan on the kitchen counter and let the laddu mixture cool at room temperature.
Grinding Sugar And Roasted Rava+Coconut Mixture
a. When the laddu mixture had cooled, take ½ cup sugar in a grinder jar.
b. Grind the sugar to a fine powder. Now do not open the lid. Wait for a few minutes. If you open the lid immediately after grinding, you will some of the sugar powder drifting in the air.
c. To the powdered sugar in the jar, add the rava+coconut mixture.
d. Grind to a semi-fine or fine texture. Keep the grinder jar aside.Frying Dry Fruits
a. In the same pan, in which rava was roasted heat 3 tablespoons ghee on a low to medium-low flame.
b. Add 3 tablespoons chopped nuts. You can add almonds, pistachios, cashews or any nuts you like.
c. Fry the nuts in the ghee till they start to become golden.
d. Then add 1 tablespoon raisins. stirring often fry the raisins till they plump and swell in size.
e. Switch off flame and keep the pan on the kitchen counter.Making Rava Laddu
Rava Laddu
a. Add the ground rava+coconut+sugar mixture directly from the grinder jar. the ghee should be hot when you add the powdered rava mixture.
b. Mix very well with a spoon or spatula.
c. Add ½ teaspoon cardamom powder.
d. Mix again very well and then wait for the laddu mixture to become lightly warm or completely cooled at room temperature. If unable to form ladoo, then add 2 to 3 teaspoons of melted ghee. In case ladoo don’t hold shape and flatten, then keep the mixture in the fridge for 20 to 30 minutes and then shape in rava ladoo.
e. Then take some portion of the mixture in your palms and shape into round balls which we call as ladoo.
f. Make rava laddu with the entire mixture. Keep them in an air-tight steel jar.
g. Serve rava laddu as a festive sweet. Store them in the fridge.
5. Gulab jamun

Gulab Jamun, it’s a popular Indian sweet made with khoya (mawa) and sugar syrup. It’s a mouth-melting crowd-pleaser perfect as a treat for special occasions like Diwali, Eid, or Raksha Bandhan.
Fall in love with this recipe and share a bowl of full homemade goodness with family and friends.
Ingredients For Gulab Jamun:
200 gram khoya (mawa)
1/3 Cup semolina (rava/sooji)
1/4 Cup paneer (cottage cheese), crumbled
1 teaspoon cardamom powder
1/4 teaspoon baking soda
1/4 Cup water
4 Cup Ghee/Refined Oil for deep frying
Ingredients For Sugar Syrup:
2 Cup sugar
2 Cup water
1 teaspoon green cardamom powder
1/4 teaspoon saffron
InstructionsHow To Make Gulab Jamuns With Khoya:
Gulab Jamun
a. Grate khoya in a clean bowl. Please note that for soft Gulab Jamun it is necessary to grate khoya and not to crumble it with fingers. Set aside.
b. In a separate bowl add sooji and pour 1/4 Cup of water over it to moisten and soften sooji. Set aside for 5 – 10 minutes so that water is absorbed by sooji. This helps in mixing it well in the dough. Do not get carried away and add too much water.
c. To make a dough, combine grated khoya, softened sooji, crumbled paneer, baking soda, and cardamom powder. Knead well for 5 – 10 minutes or until smooth, soft and firm dough is formed.
d. Let it rest for 5 – 10 minutes in the fridge while you heat oil for deep frying.
e. To shape Gulab Jamuns, pinch a small portion from the dough and shape it round rolling between your palms. Similarly, shape rest of the gulab jamun.
f. Heat oil in a heavy bottom pan over medium heat.
g. Deep fry the khoya balls in small batches over low heat until dark brown on both sides. Keep the flame low to medium while deep frying for even cooking.
h. Drain fried balls on a kitchen towel while you prepare sugar syrup.
To all our brothers and sisters in the Indian community, we wish you & your family a Successful and Prosperous Diwali. Happy Diwali!
Over to you…
Need help renovating your kitchen? We can help you with that. Just send us a message and let us create your dream kitchen together. Happy cooking!
The post Happy Diwali: 5 Easy to Make Diwali Snack Recipes appeared first on Cattleya Kitchens.
]]>The post Halloween On: 5 Spooky and Delicious Vegan Halloween Recipes for your Undead Party appeared first on Cattleya Kitchens.
]]>- Witchy Guacamole Dip
- Mummy Quesadillas
- Silly Apple Bites
- Nakd Graveyard Chocolate Mousse Pot
- Halloween Pizza
The Halloween is creeping its way to your homes and it got one message for you. ‘Boo!’ Have an undead party for the living and serve them well with spooky yet delicious vegan snacks that would surely spook their tastebuds.
Here’s our list of spooky vegan recipes to get started with your Spookfest:
1. Witchy Guacamole Dip
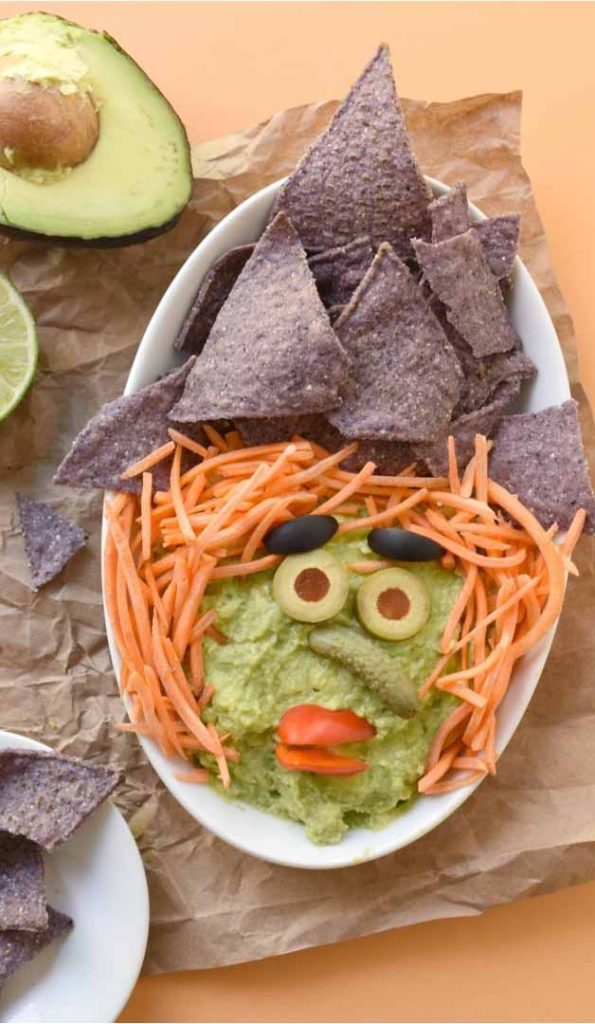
Be enchanted with this witchy guacamole dip and give your taste buds a wicked good time and experience the magic of evil filling your stomach.
The trick is to let your imagination come to play and decorate yourself one spooky witch dip for everyone to enjoy.
Note: Other spooky figures can be used as inspiration so be sure to let your imagination run wild.
INGREDIENTS
2 large avocados
1/4 red onion, thinly chopped
2 garlic cloves, minced
juice of 1 lime
shredded carrots (for the hair)
2 green olive slices (for the eyes)
2 black olive slices (for the eyebrows)
2 slices of a mini red bell pepper (for the lips)
1 cornichon (for the nose)
handful blue corn chips (for the hat)Witchy Guacamole Dip
INSTRUCTIONS
a. In a bowl, mash the avocado. Add the garlic, onions and lime juice and mix until well combined. Season with sea salt for flavor.
b. Add the guacamole to the lower half of a serving plate.
c. Create the corn chip hat first and then add the carrots for the hair.
d. Assemble the face and serve!
2. Mummy Quesadillas

Your favourite Mexican snack turned into a mummy perfect for the Halloween spirit is what we think is missing as an appetizer for your party.
This wrapped goodness is your undead come to life to give a fright and deliciousness to your party. Plus, it is great for toddlers and kids.
INGREDIENTS
1 sleeve of polenta 18 ounces
6 slices white dairy free cheese
1/2 cup fresh salsa or jarred
1 can 15 ounces black beans (you will have extra to serve on the side)
Guacamole optional as a sideMummy Quesadillas
INSTRUCTIONS
a. Preheat oven to 400 degrees.
b. Slice polenta into 1/4 inch rounds (should make 15 slices), place on a parchment lined baking sheet and bake for 35 minutes, flipping at 20 minutes.
c. Meanwhile cut cheese slices into 1/4 inch strips, then cut those strips in half so they are about 2 inches long. Rinse black beans.
d. When polenta slices are done, take out of the oven. Top with about 1/2 tablespoon salsa, place black beans for the eyes. Then cover with cheese slices back and forth to form mummy strips.
e. Place back in the oven and bake for another 10 minutes. Serve and watch little faces light up with excitement! For a complete meal, serve with the extra black beans and guacamole or diced avocado on the side.
3. Silly Apple Bites

Mike Wazowsky will be proud of this one. These silly apple bites are your combination of healthy and spooky suited for your spookfest.
This meal preparation only requires your time and patience, well, of course, the fruity ingredients too but no cooking will be involved, perfect as snacks for your ghoul guests.
INGREDIENTS
2 green apples, each quartered
sunflower butter
32 sunflower seeds
2–3 strawberries, sliced
1–2 homemade googly eyes per apple biteSilly Apple Bites
INSTRUCTIONS
a. Cut the middles out of each quarter of the apple to create a mouth. Don’t worry about perfection, you are filling this gap with sunbutter anyway so if you cut too deep, you can always just cover it up and no one will know.
b. Coat the inside of the cut gap with a filling of sunflower butter.
c. Place 4 sunflower seeds on the top of the “mouth” for the teeth.
d. Place 1 sliced strawberry inside the mouth for the tongue.
e. “Glue” each eye above the mouth with a dab of sunbutter to stick.
f. Serve with a smile.
4. Nakd Graveyard Chocolate Mousse Pot
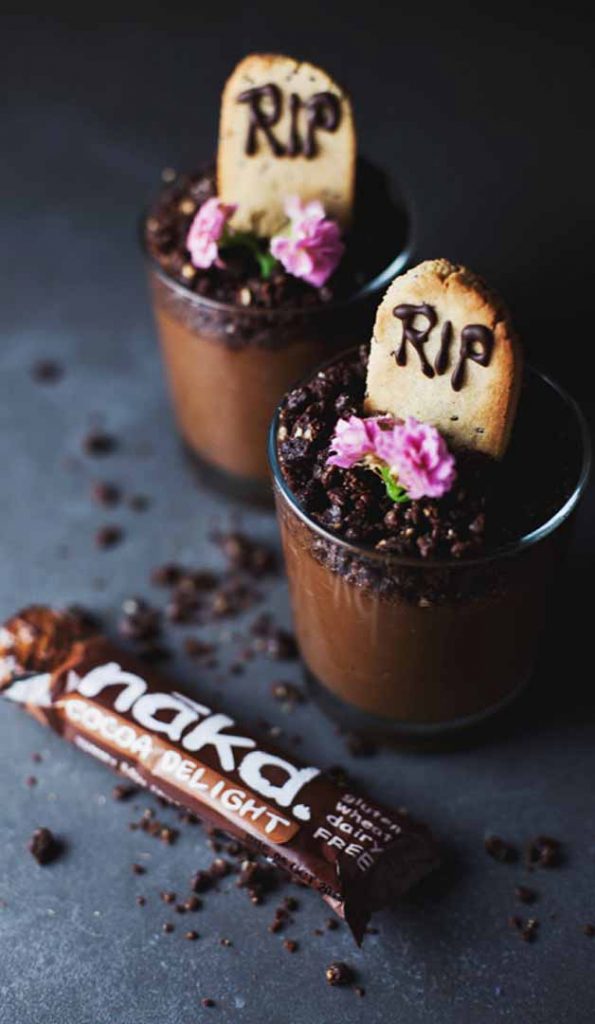
Make the extra effort and create graveyard chocolate mousse pots to pay tribute to your undead guests. You can also personalise it with the guests’ initials and guarantee an instant social media story shoutout.
Patience is required on making this one but we assure you that once finished and perfected, your efforts will be rewarded with cute smiles and appreciation from your little ghoul guests.
Ingredients
For the chocolate mousse pots
Nakd mousse pots recipe
For the tombstone cookies
175 g / 1 3/4 cup ground almonds
1 tbsp arrowroot powder
2 tbsp coconut oil
2 tbsp agave nectar
1 tbsp vanilla extract
Zest of 1 medium lemon
1 tbsp poppy seeds
For the chocolate icing
2 tbsp coconut oil
2 tbsp cocoa powder
1 tbsp agave nectar
1 tsp vanilla extract
Instructions
a. Make the mousse pots according tothese instructions. You can make two large servings or four small pots. Leave in the refrigerator whilst you prepare the cookies.To make the cookies
a. Preheat the oven to 180c / 350f and line a baking tray with parchment paper.
b. In a food processor or mixer, mix together the ground almonds and arrowroot powder. Add the coconut oil in a small bit at a time so it’s evenly distributed throughout the dough.
c. Mix in the rest of the ingredients and turn the dough out onto a board.
d. Roll the dough so it’s about 1/4 inch thick and using a small sharp knife, cut out your tombstone shapes. Or , if you have tombstone cookie cutters, even better!
e. Transfer to the baking sheet and bake for 5-8 minutes until golden brown around the edges. Leave to cool before icing.
f. To make the icing
g. Melt the coconut oil over a bowl of hot water. Stir in the cocoa powder, agave and vanilla extract. Leave to cool in the fridge for a few minutes.
h. Transfer the chocolate to an icing bag with a narrow nozzle, suitable for writing. Test a small amount to see if the icing is too runny. If so, return to the fridge to firm up slightly. Once it’s the perfect texture, pipe your RIP letters onto the top of the tombstone cookies and leave to set in the fridge for at least 10 minutes.To assemble
Nakd Graveyard Chocolate Mousse Pot
Stand the tombstone cookies on top of your mousse pots.
Optional: Add a few small edible flowers to complete the look.
5. Halloween Pizza

The beloved morning, lunch, and even dinner meal can also be turned into a spooky treat for your ghoul guests. This Halloween pizza can be shaped and garnished with terrifying creatures perfect as snacks for your Spookfest.
Just have fun with mozzarella and cheddar and turn your pizza into a mummy or a ghost.
Mozzarella and Cheddar ghosts and Mummies with Sun-dried Tomato Marinara on Sesame Barley crust
Dairy, egg, soy, nut, corn free recipe
Makes 4, 4-5 inch pizzas.
Ingredients:
Crust:
1/2 cup water
1.5 teaspoons active yeast
2 teaspoons raw sugar
1/4 cup coarsely ground white Sesame seeds
1/2 cup Barley flour
1/2 cup bread flour
1/3 teaspoon salt
1 teaspoon dried basil
2 teaspoons extra virgin olive oil (evoo)
2-3 Tablespoons bread flour for dusting.
Sun-dried Tomato Marinara sauce:
1 Tablespoon evoo
1/4 cup chopped onion
1 bay leaf
2 ripe large tomatoes
3-4 garlic cloves
2 Tablespoons sun-dried tomato
1/2 teaspoon dried herbs(I used basil and parsley)
1/3 teaspoon salt
I made this batch with
a. With 1/2 cup full fat canned coconut milk. 1/4 cup So delicious creamer, 1.5 teaspoons agar powder, 1/3 teaspoon salt, a generous pinch of black salt, 3/4 teaspoon coconut vinegar, pinch of garlic powder, pinch of mustard powder. Once agar is mixed in, add 1 teaspoon tapioca starch and 1 teaspoon potato starch
b. After the last step when the starches were all mixed in, I poured half into a container to set as Mozzarella and converted the other half to cheddar.With 1 tablespoon chickpea miso, 1/8 teaspoon mustard powder, 1.5 tablespoons nutritional yeast and 1/8 teaspoon turmeric powder. Mix in, cook on low for half a minute. Pour and let sit for atleast an hour in refrigerator.
Sun-dried tomato Marinara sauce:
a. In a pan, add oil and heat on low-medium.
b. Add onions, dried herbs and bay leaf. Cook for 5-6 minutes until translucent.
c. Blend tomatoes, garlic and sundried tomatoes into a puree.
d. Add the tomato puree to the onions. Add salt, herbs and cook on low-medium heat until the sauce thickens. 10-15 minutesHalloween Pizza
Crust:
a. In a bowl, add warm water, yeast and sugar. Mix well and let sit for 10 minutes until frothy.
b. Add the flours, salt, evoo, herbs and mix well for 2 minutes.
c. Cover the bowl with a damp towel. Let the dough sit/rise for 1.5 hours or until doubled.
d. Add 2 Tablespoons of flour, gather it and knead into a smooth dough for 2-3 minutes.
e. Divide the dough and shape into shapes of choice. Ghosts. squares, pumpkins.
f. Top with Sundried Tomato marinara, Kalamata olives and cheese strips and cheese ghosts.
g. I used olive slices and small olive pieces to make the eyes.
h. Bake in preheated 400 degrees F oven for 12-13 minutes.
i. Broil on Lo for half a minute to melt the cheese.
j. Remove from oven, let cool for a minute and serve.
Embrace the Halloween spirit with a full tummy and enjoy the trick or treat season. Happy Halloween!
Perhaps you best enjoy eating healthy snacks while watching the game because it’s about that time of the year.
Over to you…
Need help renovating your kitchen? We can help you with that. Just send us a message and let us create your dream kitchen together. Happy cooking!
The post Halloween On: 5 Spooky and Delicious Vegan Halloween Recipes for your Undead Party appeared first on Cattleya Kitchens.
]]>